Imagine walking into a friend’s house and seeing a massive, empty white wall staring back at you. It feels cold and unfinished like a house no one actually lives in. I remember helping a neighbor who spent $5,000 on a new sofa but still felt her space was “off” because the vertical surfaces were bare. We spent a weekend and less than $300 on a DIY trim project that completely changed the room. Choosing the right living room wall designs can be the difference between a house that feels like a showroom and one that feels like a high-end custom home. Most people think they need expensive contractors but the right layout and texture do the heavy lifting for you.
Executive Summary
You will discover how to transform your space using strategic vertical elements that prioritize both aesthetics and financial return. This guide covers 23 distinct methods ranging from simple paint techniques to architectural installations. We explore options with a typical cost range of $50 to $2,500 depending on the scale of your ambition. I have seen these specific updates add up to 5% to a home’s perceived value during appraisals. We will exclude temporary decals or low-quality stick-on options that often peel and lower the quality of the finish. Instead, we focus on permanent and semi-permanent solutions that look professional and last for years. You will gain a clear roadmap for creating a focal point that reflects your personal style while adhering to modern design standards.
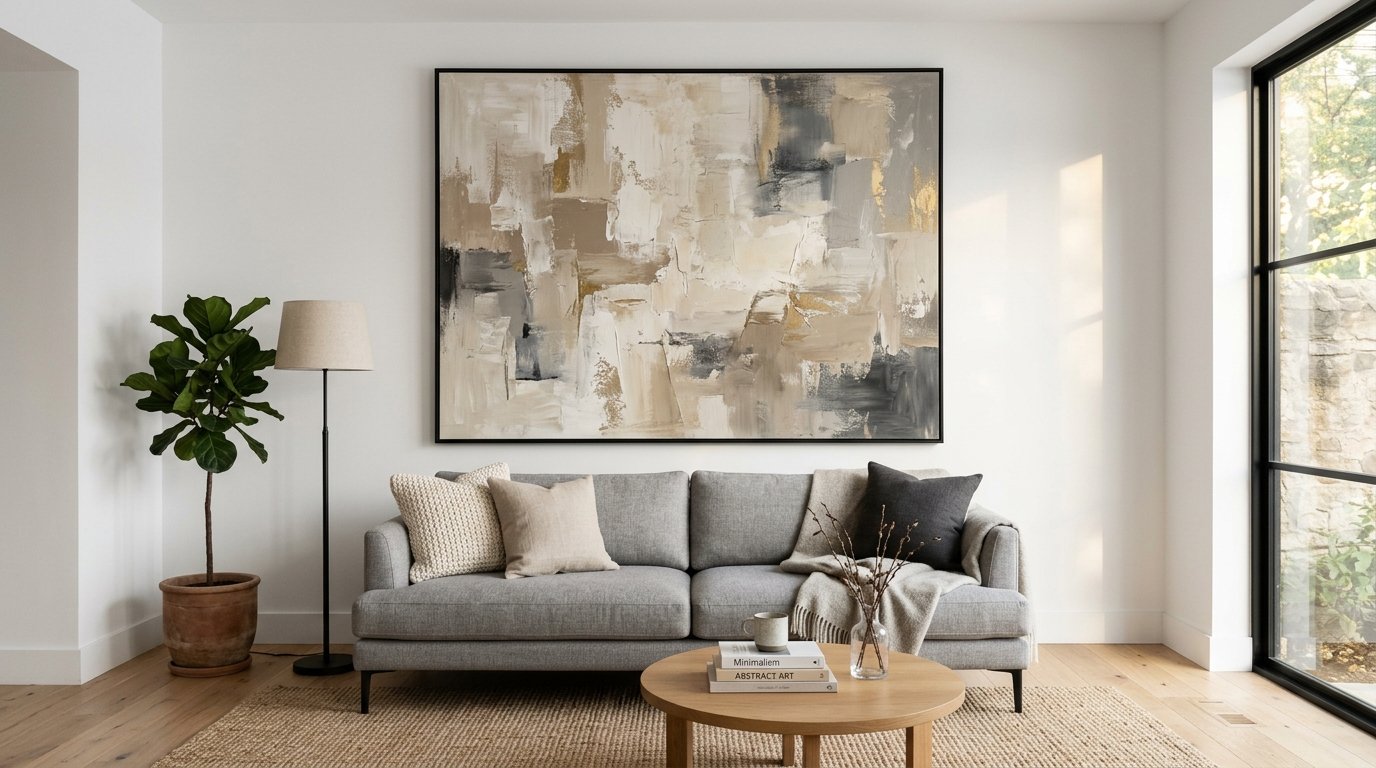
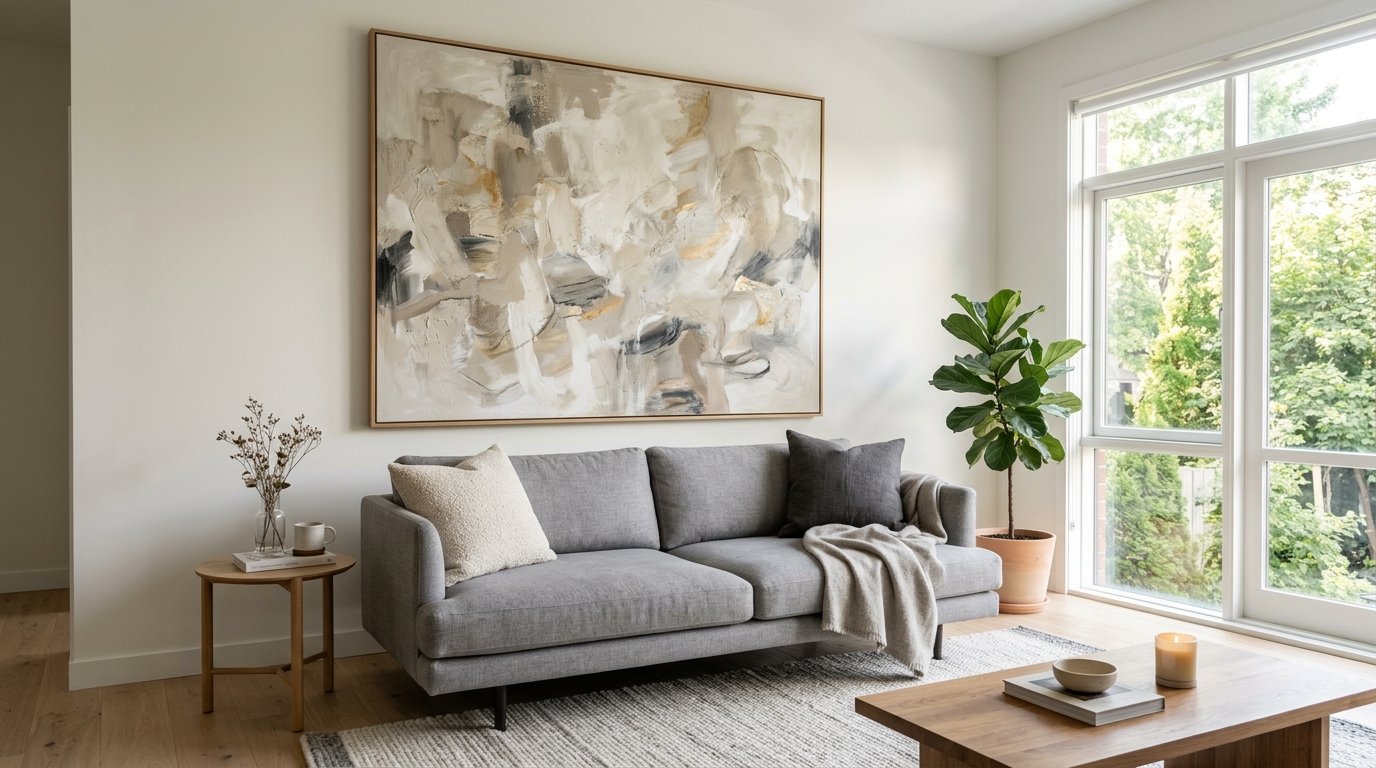
1. Over-sized Canvas Art
Large scale art creates an immediate focal point without the need for multiple small holes in your drywall. I once used a single 60×40 inch abstract piece to ground a room with 12-foot ceilings and it worked better than a dozen smaller frames. It simplifies the visual field and makes a small room feel much more expansive.
A great brand for high-quality canvas is Juniper Print Shop which offers large formats that look like original oil paintings. The cost for a frame this size usually runs between $150 and $400. One common mistake is hanging the piece too high. Always keep the center of the artwork at eye level about 57 inches from the floor.
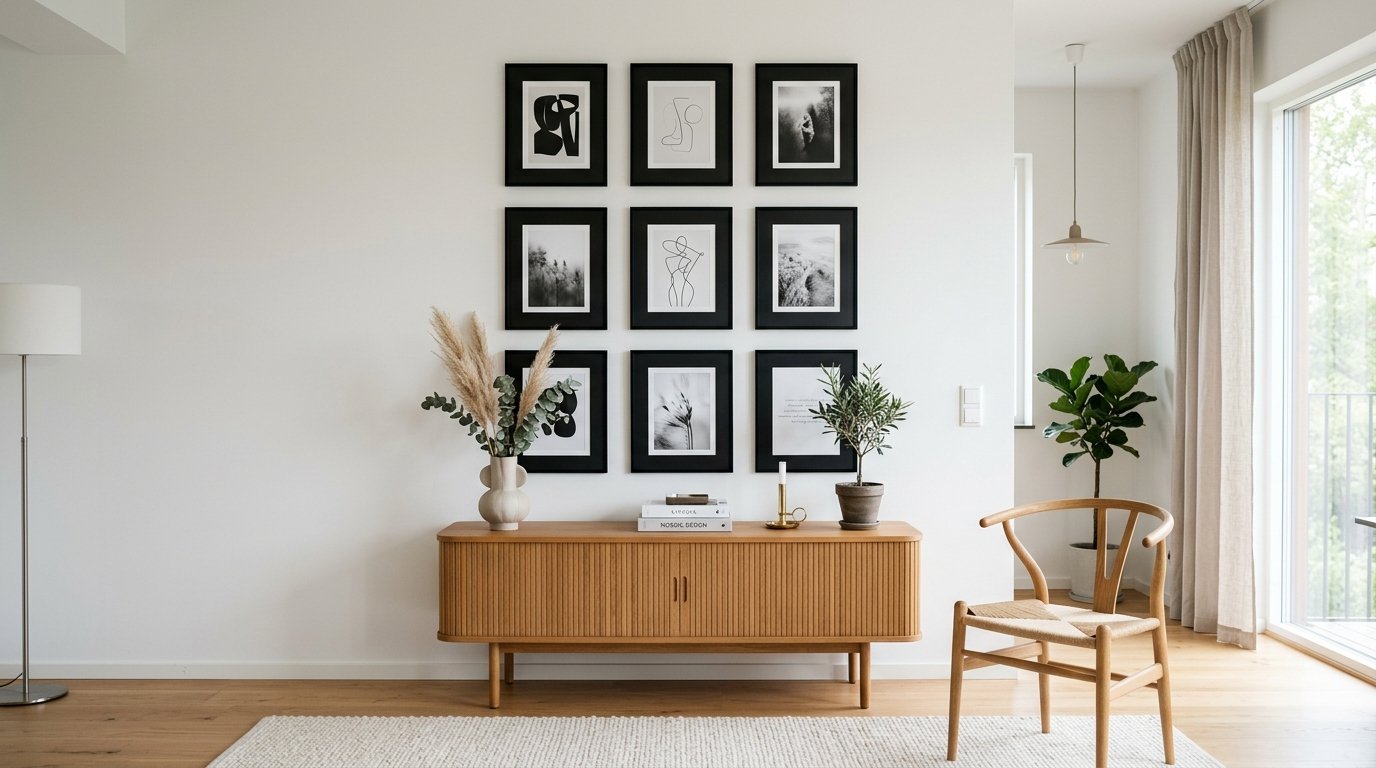
2. Framed Grid Gallery
A grid gallery offers a structured and symmetrical look that feels curated and intentional. I have found that using identical frames with large white mats creates a high-end look even if the photos inside are just simple family snapshots. Use a laser level like the Bosch GLL25-10 for this project to ensure every frame is perfectly aligned.
A typical setup involves nine 12×12 frames arranged in a three-by-three square. This project takes about three hours to measure and hang. Expect to spend $200 on frames from a place like Target or West Elm. If your alignment is off by even a quarter inch the whole design will look messy.
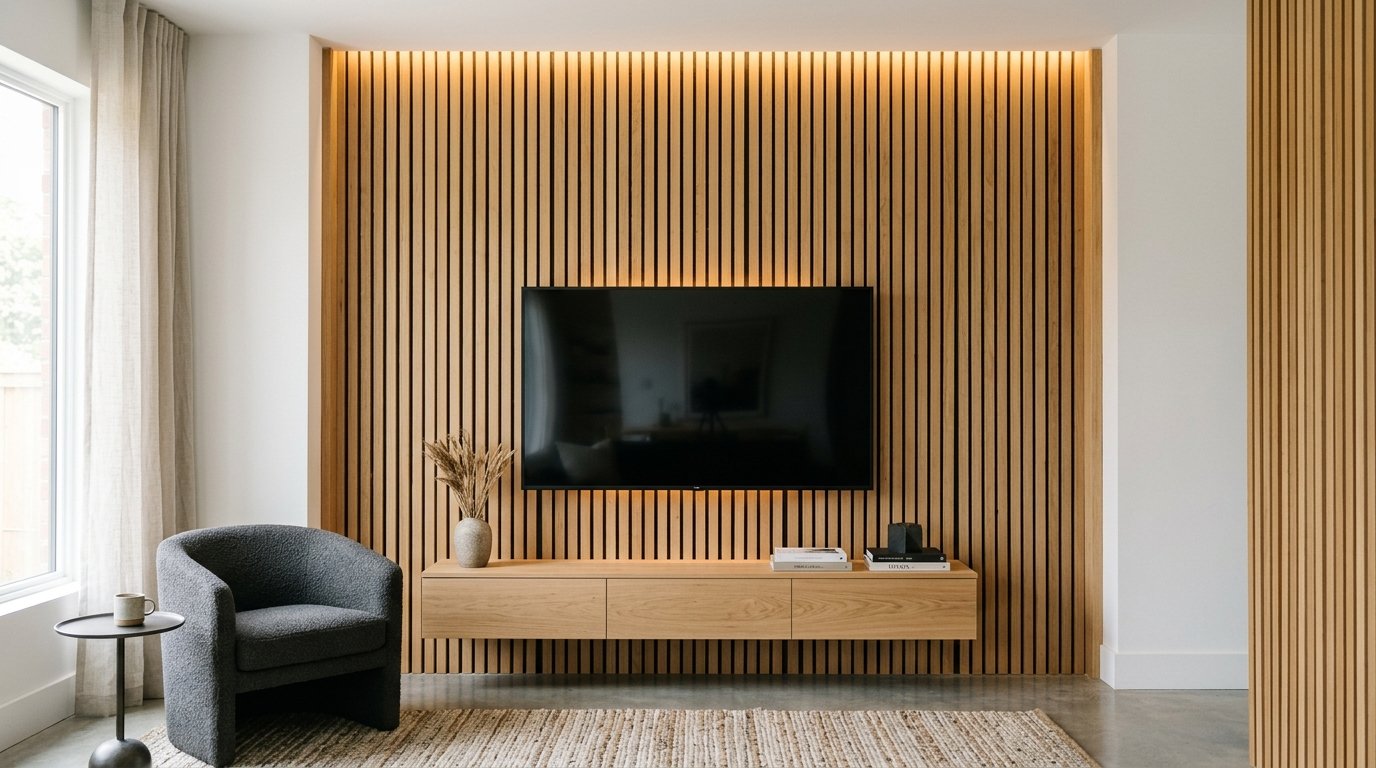
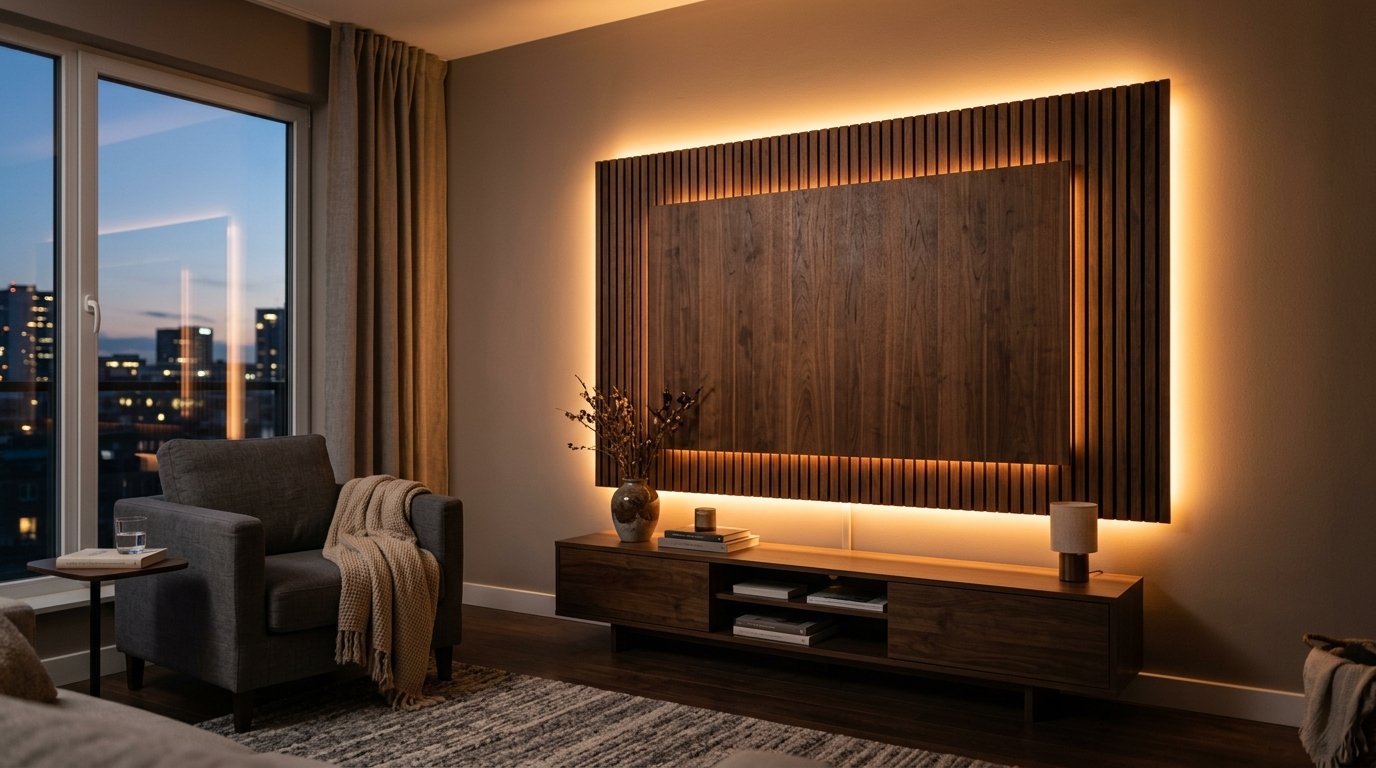
3. Vertical Slat Paneling
Thin wood slats add texture and a modern architectural feel to a standard flat surface. I recently saw a home where the owner used white oak slats to hide a hidden door and the result was stunning. You can use individual pieces of 1×2 pine or purchase pre-made acoustic panels from brands like Art板.
Expect a cost of roughly $15 per square foot. Installation requires a miter saw and a nail gun. A common error is not painting the wall behind the slats a dark color. Using a black or charcoal base paint creates depth and makes the wood pop significantly more than a white background.
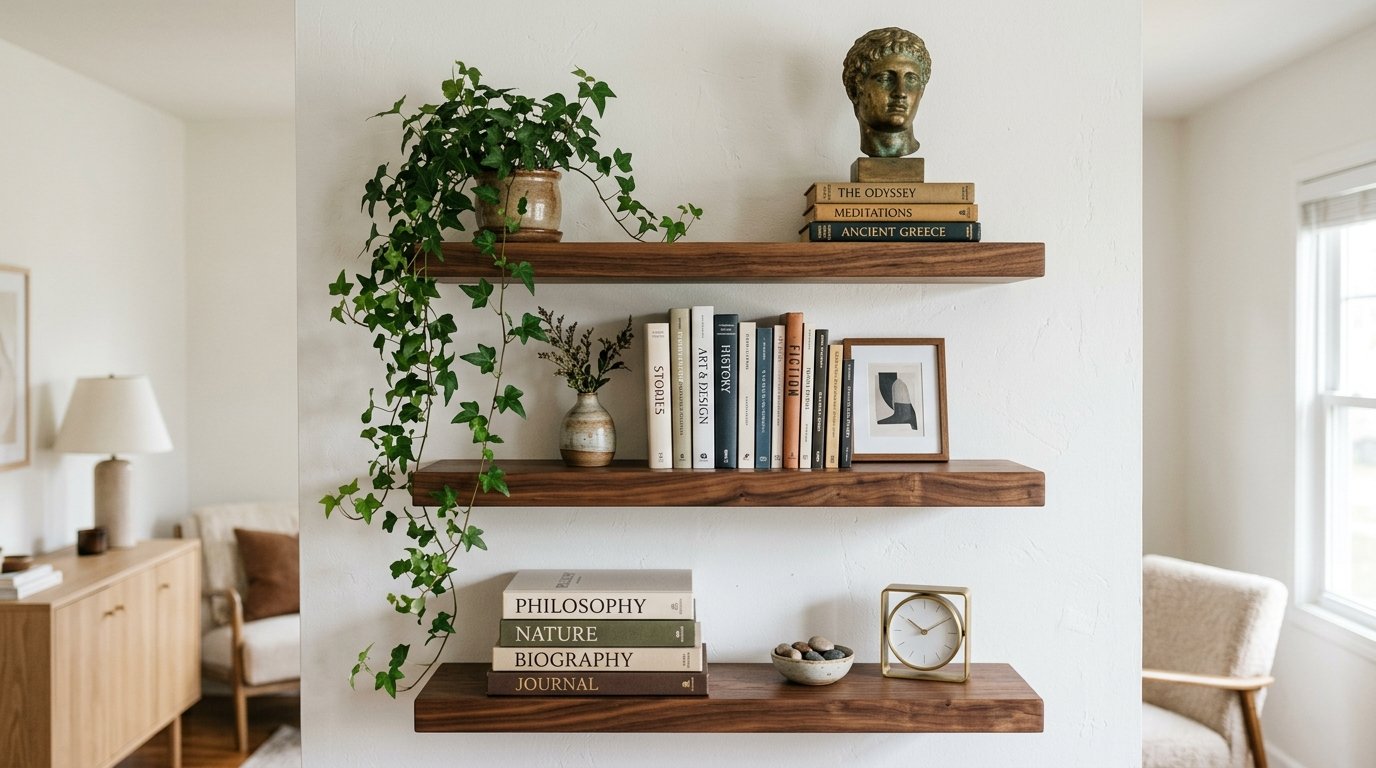
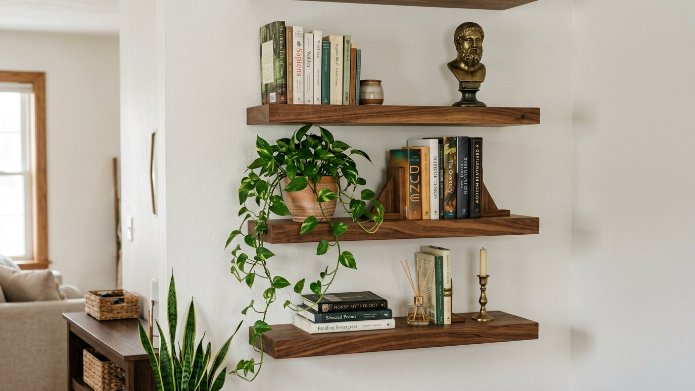
4. Floating Shelf Clusters
Floating shelves allow you to rotate decor seasonally without changing the structural design of the room. I prefer the clean look of the Lack series from IKEA for a budget-friendly start or custom walnut shelves for a luxury feel. They provide a place for books and small sculptures that add personality.
Budget about $80 for three shelves and high-quality anchors. Always use a stud finder because these shelves can become heavy once loaded with books. A common mistake is overcrowding the shelves. Leave at least 30% of the surface area empty to prevent the room from looking cluttered and small.
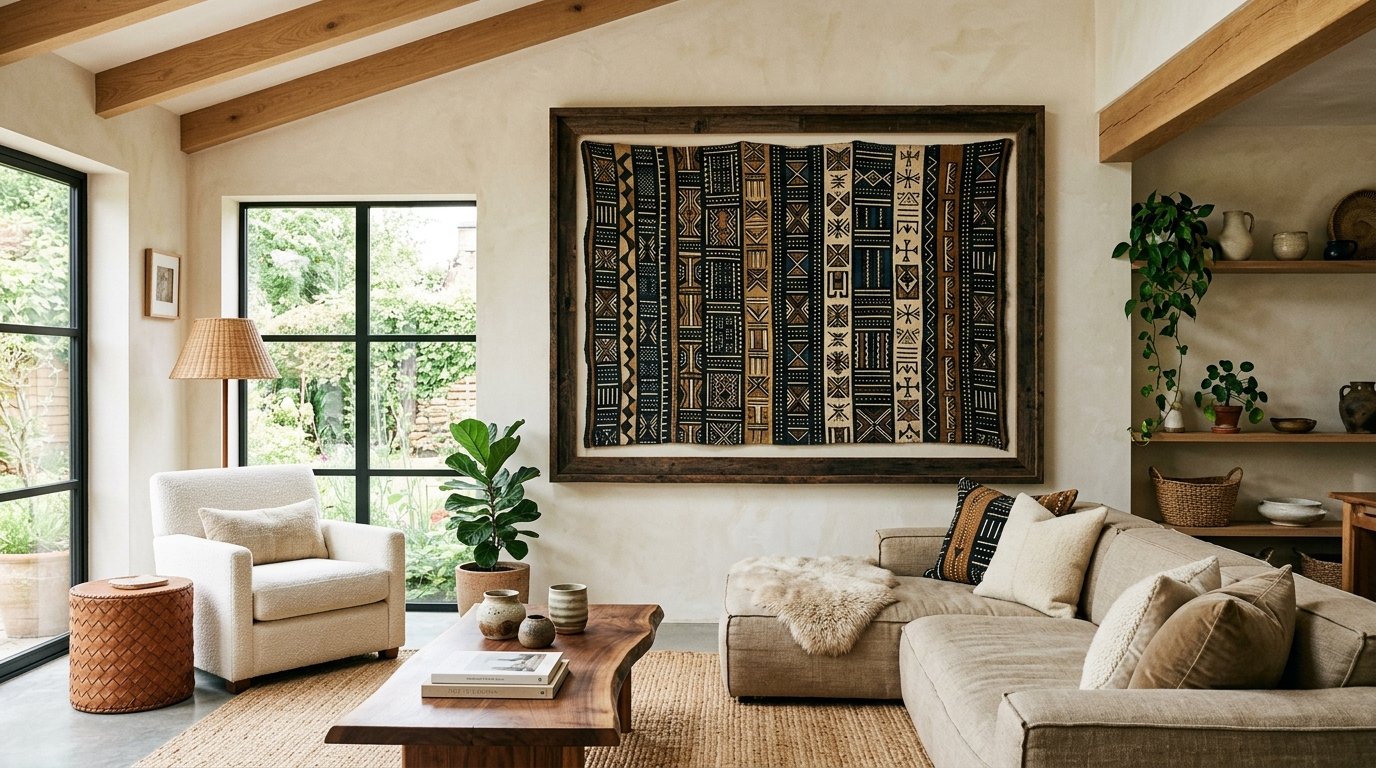
5. Framed Textile Art
Textiles add softness and acoustic benefits to a room that feels echoey or cold. Many high-end living room wall designs use vintage rugs or hand-woven tapestries to introduce organic patterns. I once framed a piece of mudcloth from a local flea market and it became the most talked-about item in the house.
You can find unique textiles on Etsy for under $100. Mounting them inside a shadow box protects the fabric from dust and UV damage. This is a great alternative to heavy mirrors or heavy framed glass if you live in an earthquake-prone area. Ensure the textile is taut within the frame to avoid a saggy appearance.
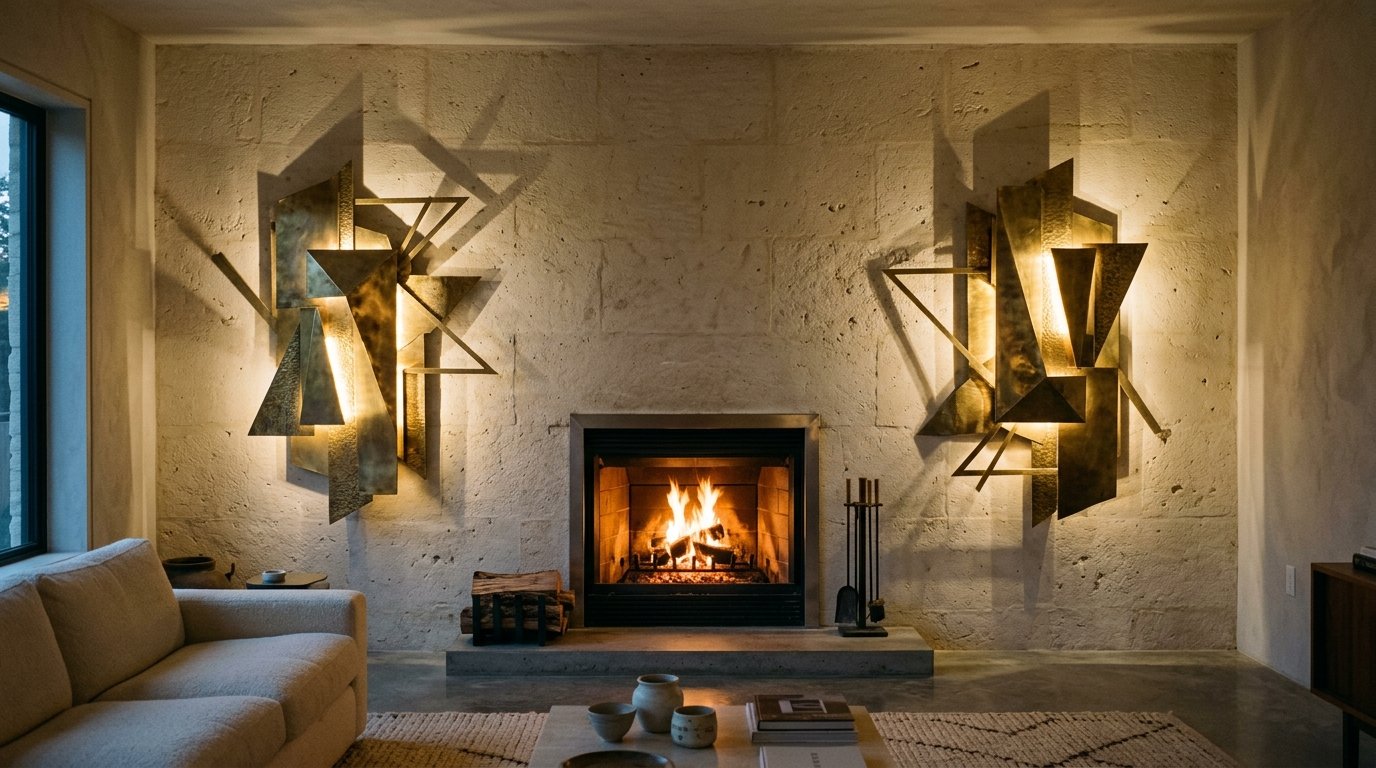
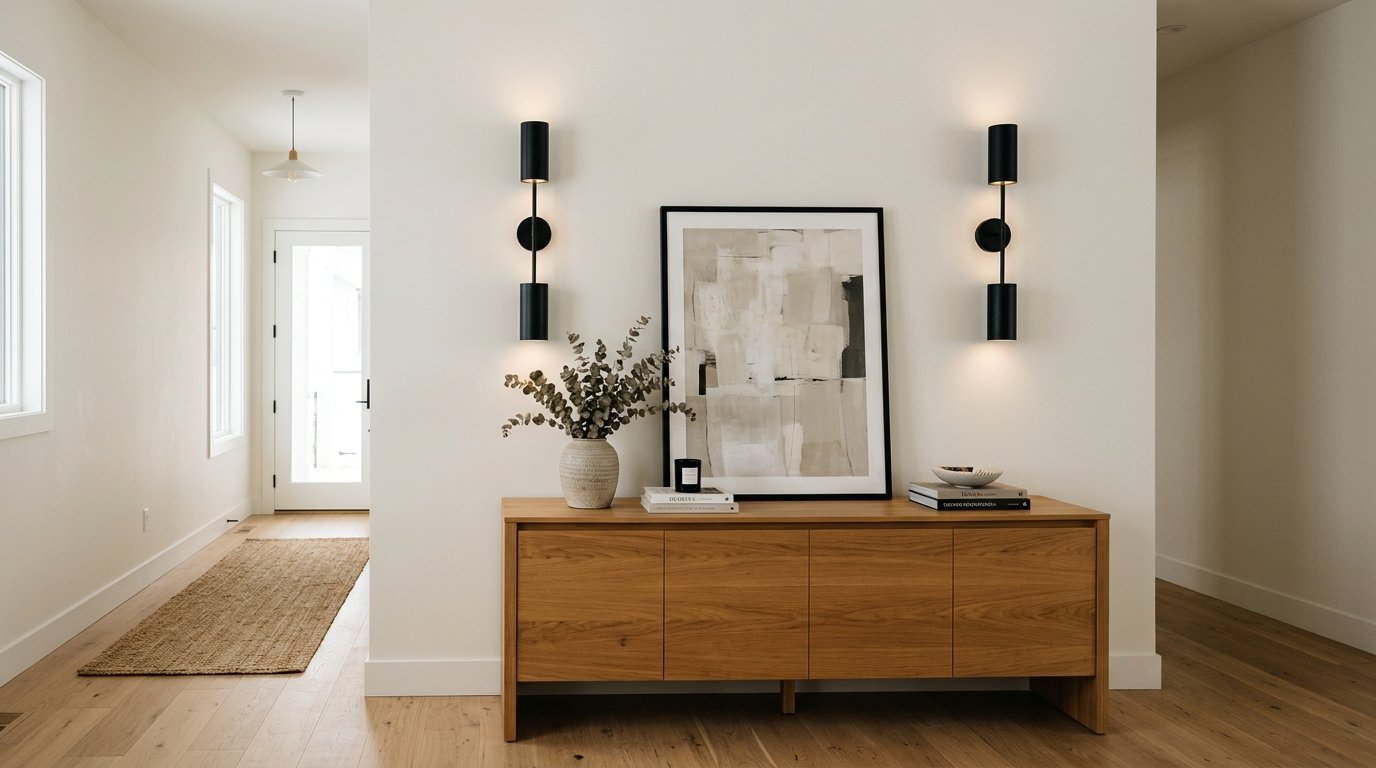
6. Sculptural Wall Sconces
Lighting is a design element that people often forget to treat as art. Oversized sculptural sconces like the ones from Visual Comfort create a dramatic shadow pattern at night. I noticed that adding two large brass sconces on either side of a fireplace instantly doubled the “luxury” feel of the space.
Hardwiring these usually requires an electrician which costs about $200 per fixture. Alternatively, you can use battery-operated “puck” lights inside the sconces to avoid cutting into the walls. Avoid sconces that are too small. They should be at least 15 inches tall to make a significant visual impact in a standard-sized room.
7. Textured Limewash Finish
Limewash paint creates a soft and mottled finish that looks like old-world plaster. Brands like Portola Paints offer a variety of tones that change beautifully as the natural light shifts throughout the day. It is an excellent way to add “movement” to a flat wall without the commitment of wallpaper.
The paint itself costs about $80 per gallon and covers roughly 200 square feet. Use a large masonry brush and apply the paint in a random “X” pattern. Do not try to make it perfect. The beauty of limewash lies in the uneven texture and natural mineral variations.
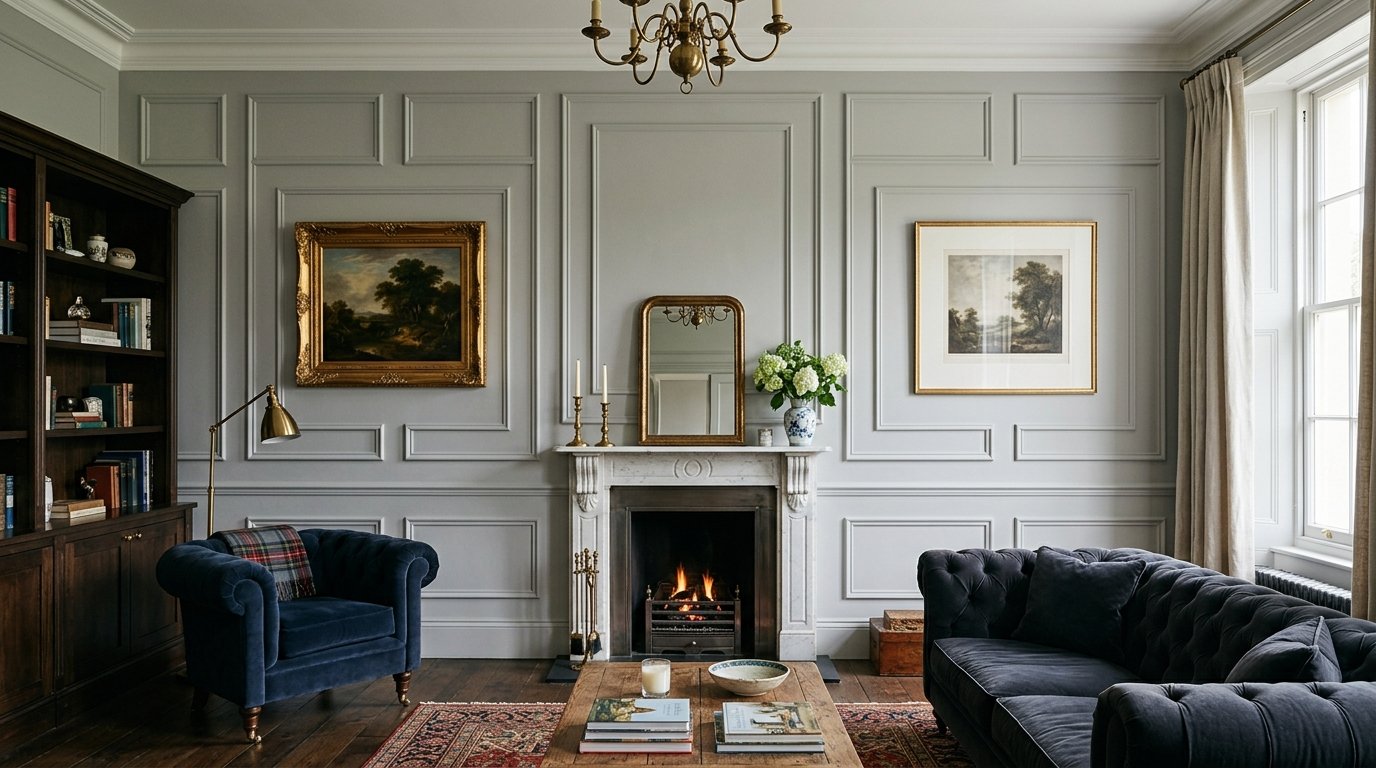
8. Geometric Picture Molding
Picture frame molding is a classic technique that adds historical character to a new construction home. I have used 1-inch PVC molding to create large rectangles on a long wall and it immediately elevated the space. It is a permanent architectural change that buyers love to see during a home sale.
A miter box and a tube of construction adhesive are the primary tools needed. Total material cost for a 12-foot wall is usually under $100. Be careful with the spacing. Ensure the distance between the frames and the floor or ceiling is consistent across the entire length of the surface.
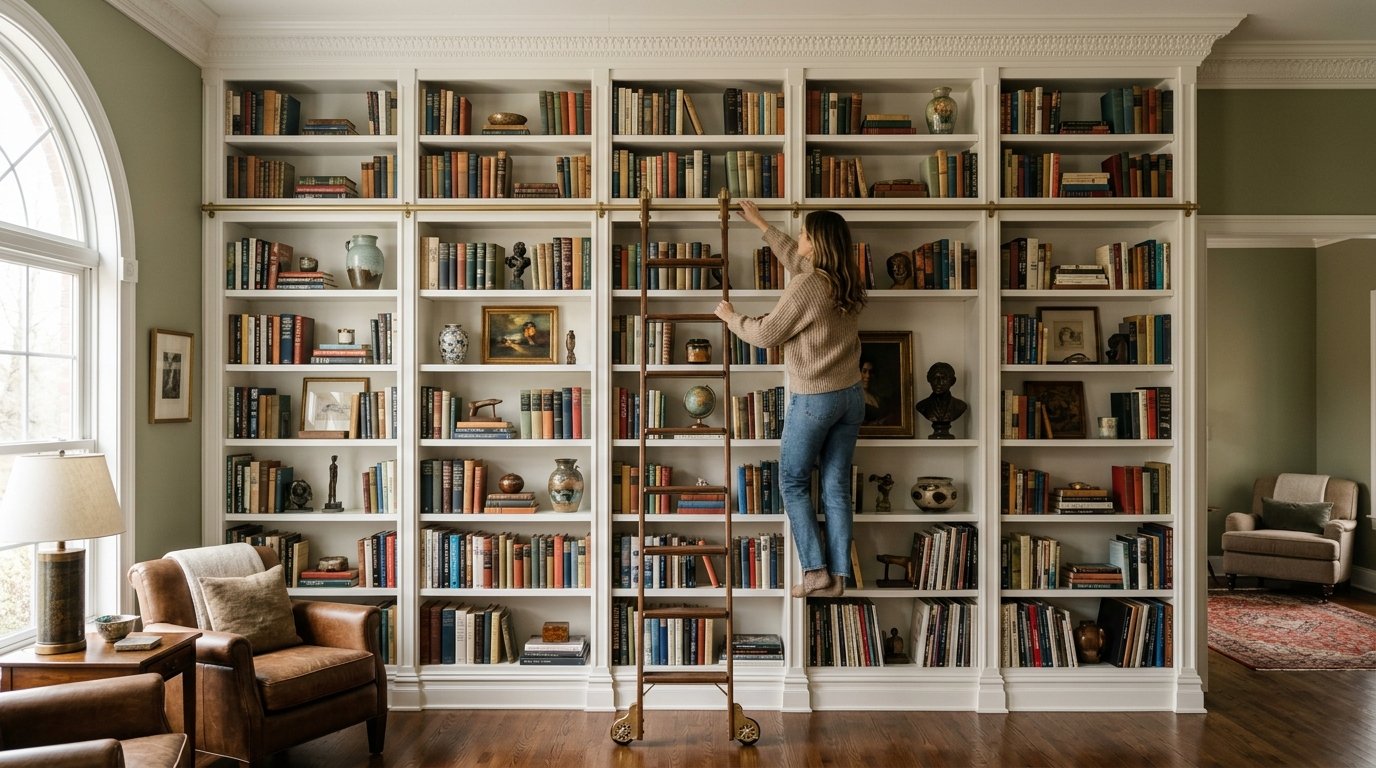
9. Floor-to-Ceiling Built-ins
Built-in shelving provides both storage and a sophisticated backdrop for your furniture. While custom carpentry is expensive I have seen many people use the “IKEA Billy Hack” to create the look for a fraction of the price. Adding crown molding at the top makes the units look like they were built with the house.
Professionally built units can cost $3,000 but a DIY version is closer to $600. It takes a full weekend to complete the assembly and painting. A common mistake is not securing the units to the wall studs. This is a major safety hazard especially in homes with small children or pets.
10. Integrated LED Strips
Backlighting a wall or a shelf creates a moody and modern atmosphere. I like using Philips Hue light strips because they can be controlled from a phone and offer millions of color options. Placing them behind a TV or under a floating shelf adds a layer of depth that paint alone cannot provide.
The strips cost about $60 each and are peel-and-stick. Hide the wires using plastic cord covers that match your wall color. Avoid using the “color changing” mode during the day. Stick to a warm white light (2700K) to keep the space looking sophisticated rather than like a gaming room.
11. Reclaimed Wood Inlay
Using wood from old barns or shipping pallets adds a rustic and warm element to a modern space. I once helped a friend install a herringbone pattern using weathered cedar and the texture was incredible. Brands like Stikwood offer real wood planks with an adhesive backing for a very fast installation.
Expect to pay $12 per square foot for the peel-and-stick variety. If you are using raw wood you will need a table saw to ensure straight edges. A common mistake is not letting the wood acclimate to the humidity in your home for 48 hours. If you skip this the wood may shrink or warp after installation.
12. Metallic Leaf Accents
Gold or silver leaf adds a touch of glamour and reflects light into dark corners. I have seen designers use gold leaf in the recessed areas of wall molding to create a subtle glow. It is a delicate process but the materials are surprisingly inexpensive.
A gold leaf kit from an art store costs about $25. You apply a special adhesive called “size” and then carefully lay the thin metal sheets over it. It is a messy process so cover your floors with drop cloths. This technique works best on small accent areas rather than an entire surface.
13. Mirror Panel Grids
Mirrors are the oldest trick in the book for making a small room look twice as large. Instead of one large mirror I recommend using a grid of smaller square mirrors with black frames. It mimics the look of a large window and adds a structural element to the space.
You can find affordable square mirrors at IKEA or Amazon for about $15 each. Use heavy-duty mounting tape to secure them in a 4×4 grid. A common error is hanging them opposite a cluttered area. Mirrors reflect what is in front of them so ensure they are reflecting a clean and attractive part of the room.
14. Floating Cabinetry Systems
Suspended cabinets create a clean and minimalist look that feels very contemporary. I prefer using the Besta system from IKEA and mounting it about 12 inches off the floor. This keeps the floor space visible which trick the eye into thinking the room is larger than it actually is.
The cabinets and mounting rail will cost around $300. You need a level and a power drill for a secure installation. Make sure you are drilling into the wall studs because these cabinets can hold a lot of weight. Avoid placing heavy electronics on top of the units if they are not properly anchored.
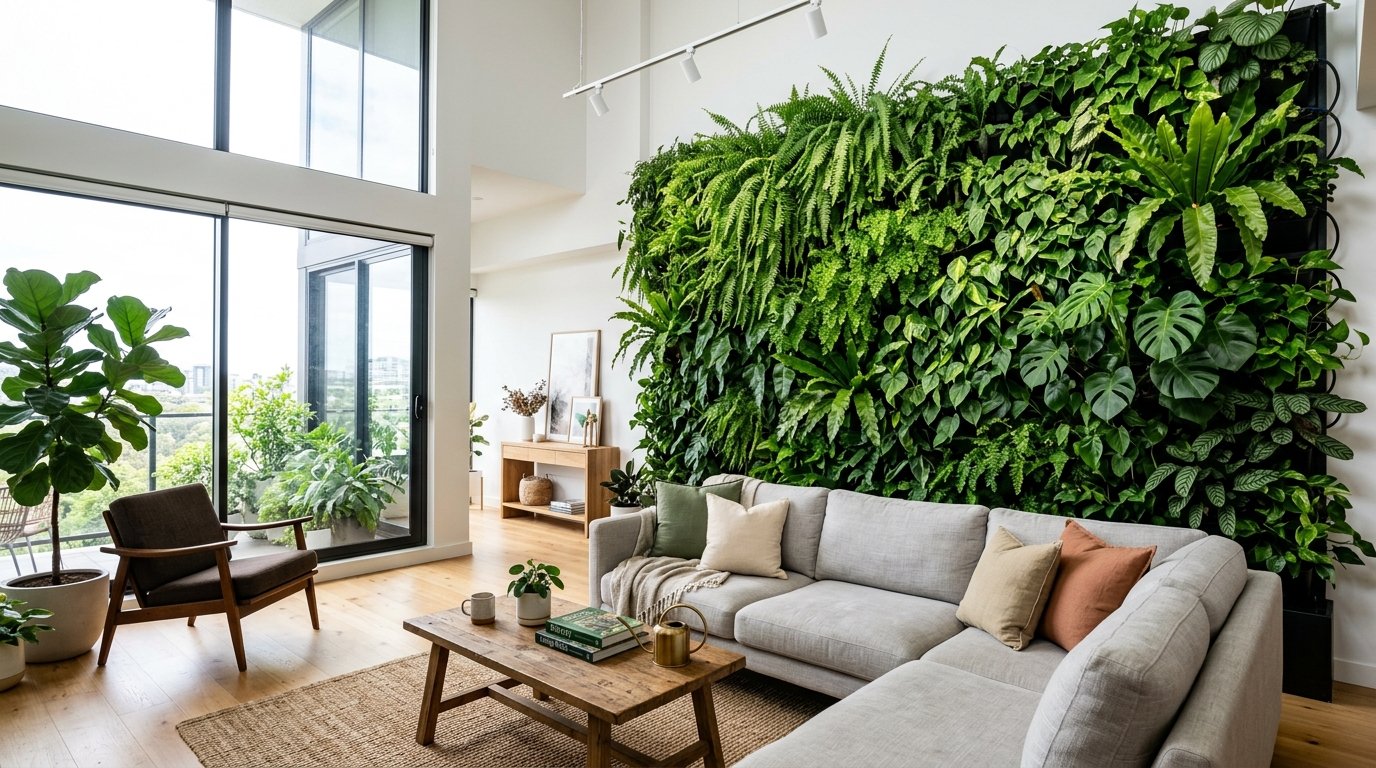
15. Botanical Living Walls
A wall covered in plants adds life and fresh air to your living environment. I have seen beautiful setups using the WallyGro felt pockets which are easy to water and maintain. It is a great way to introduce green tones if you don’t have space for large floor plants.
The pockets cost about $25 each. You will need plants that thrive in indoor light such as Pothos or Philodendrons. A common mistake is forgetting about drainage. Ensure the pockets you choose have a reservoir or a way to catch excess water so you don’t damage your drywall or flooring.
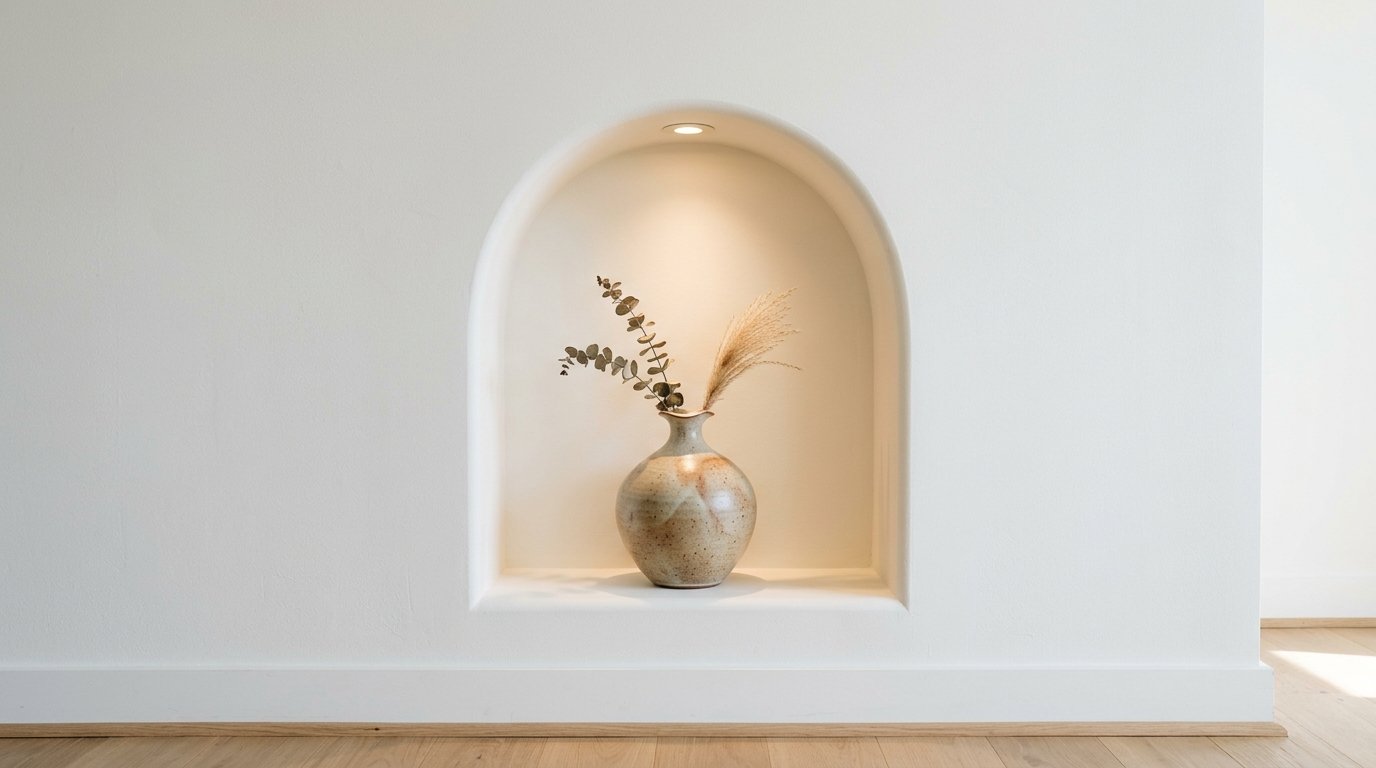
16. Arched Wall Niches
Arches are a massive trend right now because they break up the harsh straight lines of most rooms. I have seen homeowners create “faux” niches using just paint or by adding a thin layer of drywall with a curved top. It creates a perfect spot to display a single prized sculpture or vase.
If you are using paint to create the arch it only costs the price of a quart of paint and some painter’s tape. If you are building a structural niche it will require a professional and cost around $500. Avoid making the arch too narrow. It should be at least 24 inches wide to look intentional.
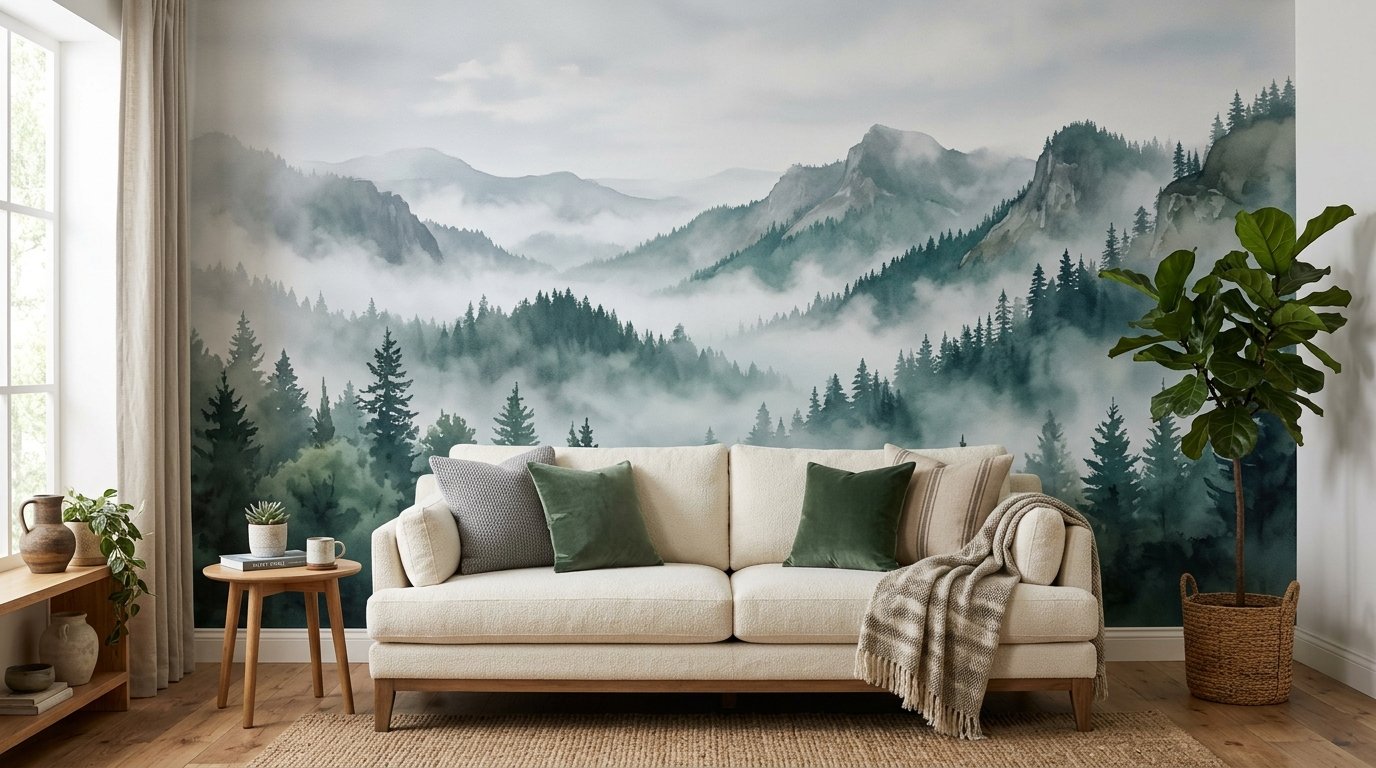
17. Custom Wallpaper Mural
A large mural can transport you to a different place without ever leaving your sofa. I recently saw a forest-themed mural in a windowless room and it completely removed the “boxed-in” feeling. Brands like Rebel Walls offer custom-sized murals that fit your specific dimensions perfectly.
High-quality murals cost around $5 per square foot. Most are “paste the wall” which makes them much easier to install than old-fashioned wallpaper. Ensure your wall is perfectly smooth before starting. Any bumps or texture on the drywall will show through the paper and ruin the effect.
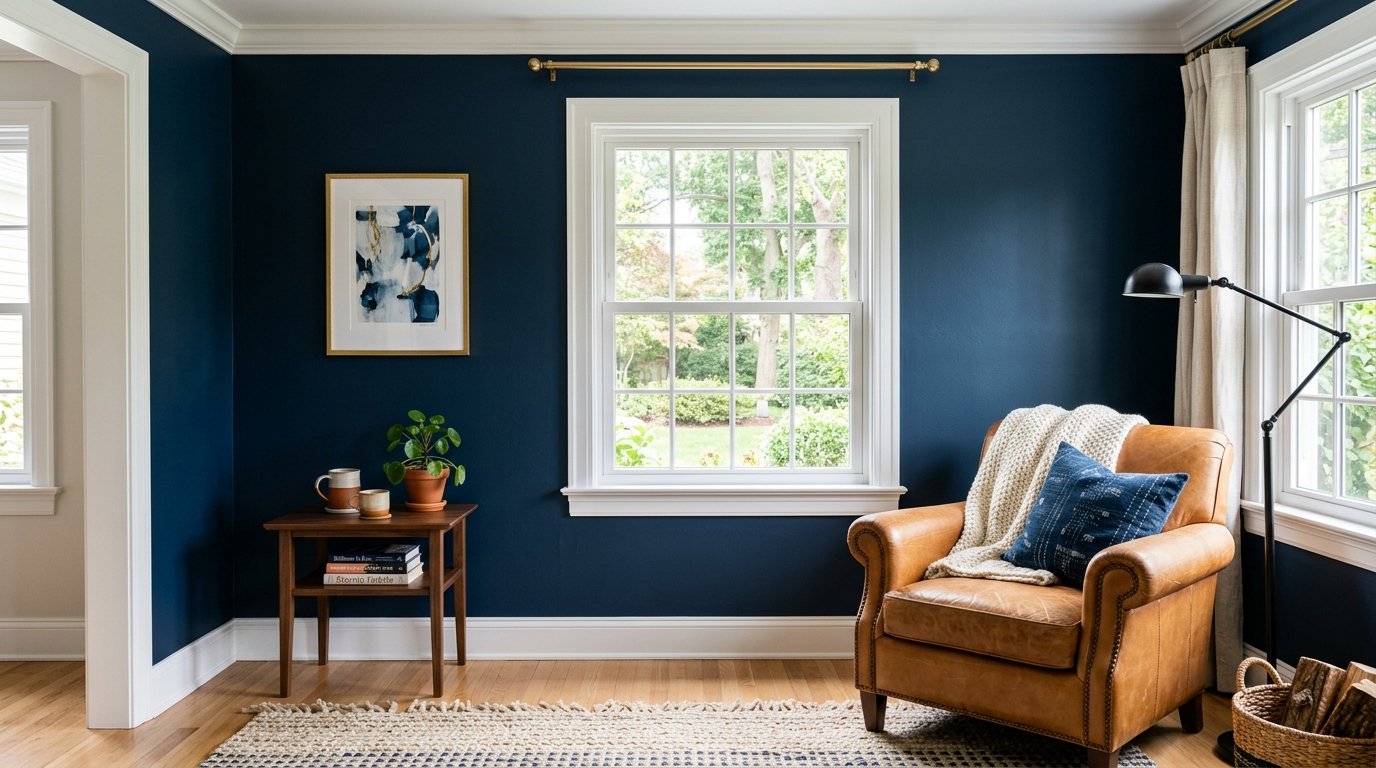
18. Dark Moody Paint
Sometimes the best design is simply a bold color choice. A deep navy or charcoal wall creates a “recessive” effect that makes the boundaries of the room feel like they are pushing back. I have used “Hale Navy” by Benjamin Moore in dozens of projects and it never fails to look expensive.
A gallon of premium paint costs $75. You will need two coats for a dark color to get a smooth and consistent finish. Use a matte or eggshell finish. High-gloss paint on a dark wall will show every single imperfection in your drywall and create distracting reflections from your lamps.
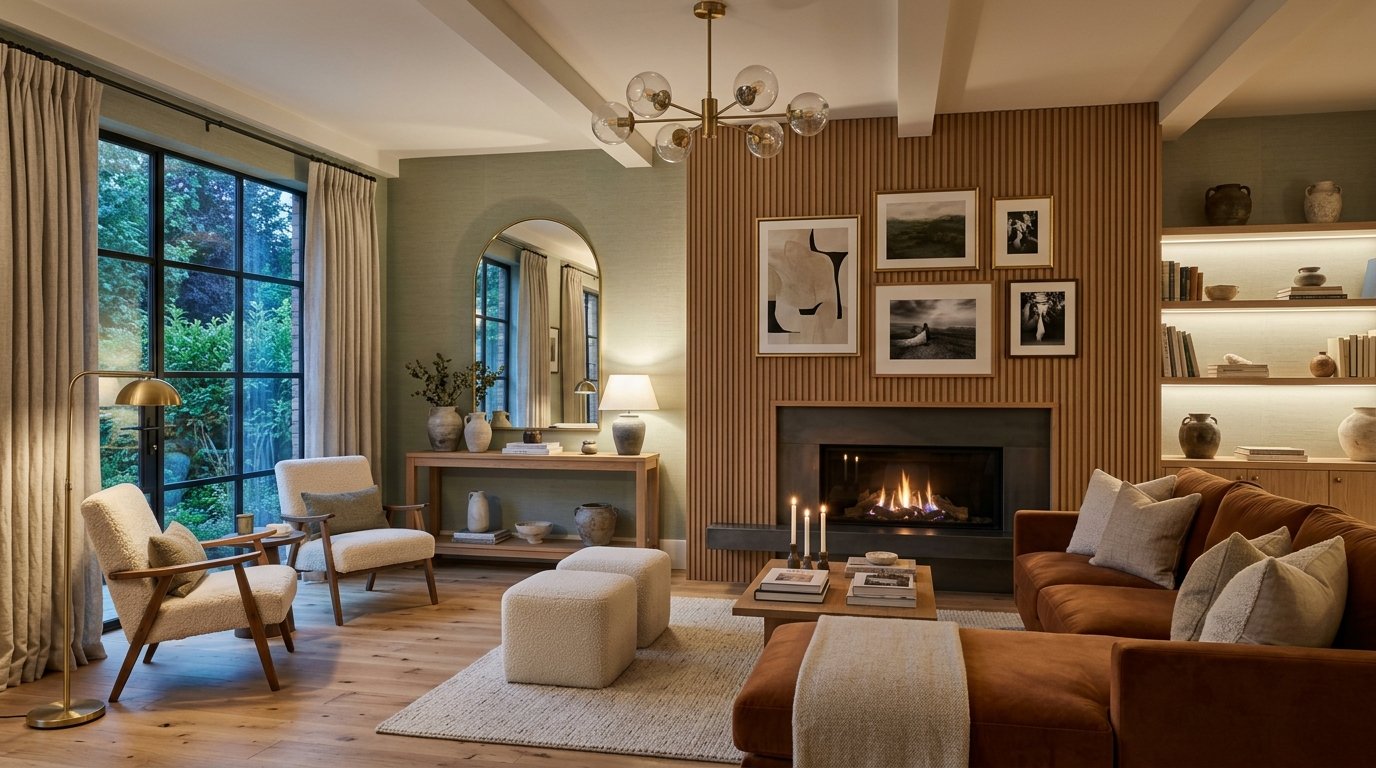
19. Layered Mixed Media
Combining different elements like a mirror on top of wallpaper or art over wood paneling adds professional-level depth. I once saw a round gold mirror hung over a dark floral wallpaper and it was the highlight of the entire house. It feels like layers of history and personality.
This approach is more about curation than a specific cost. Start with a base layer like paint or wallpaper and then add your hardware. A common mistake is using too many competing patterns. If your wallpaper is busy keep the art or mirror simple and clean to provide a visual “rest” for the eyes.
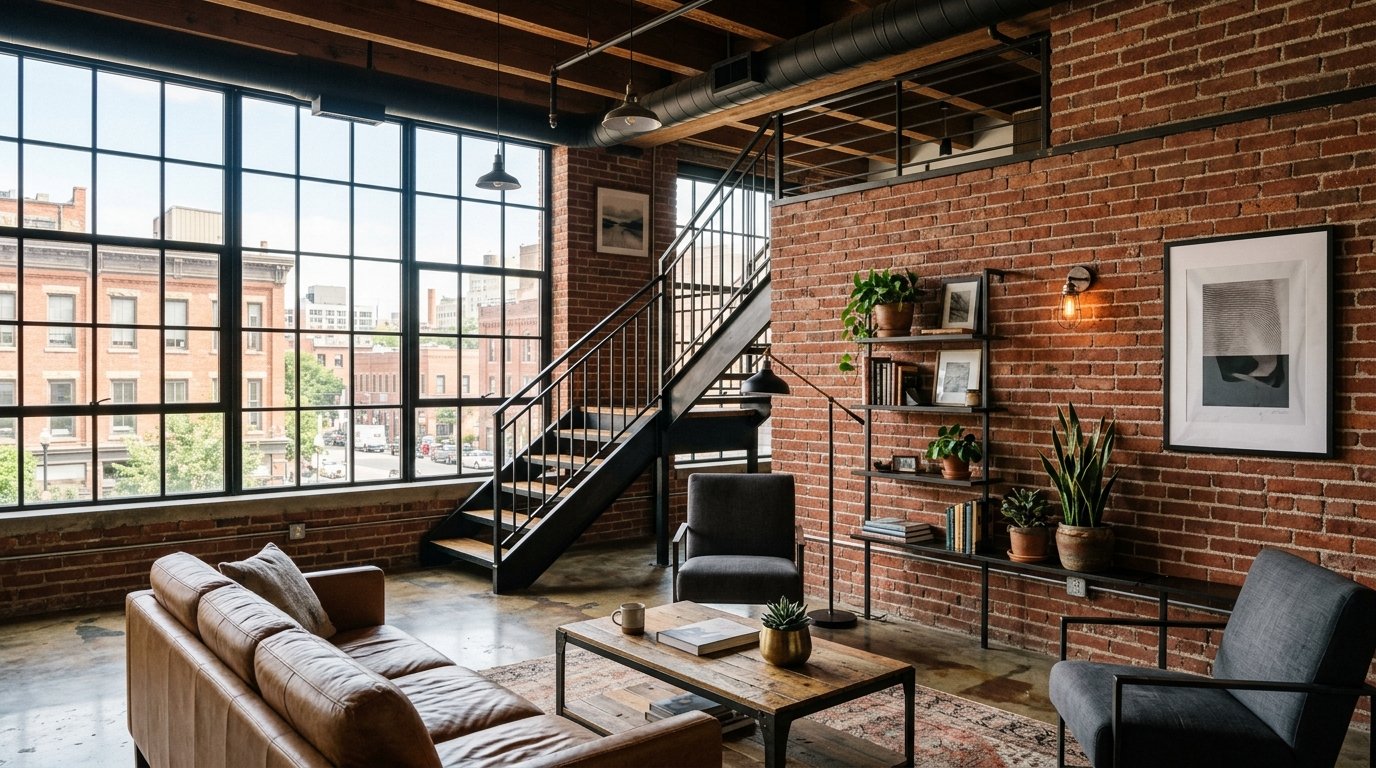
20. Exposed Brick Veneer
If you love the industrial loft look but live in a suburban home a brick veneer is a great solution. These are real thin-cut bricks that you glue to the wall and grout just like tile. I have installed this in a basement living room and it added so much warmth and character.
Materials cost about $10 per square foot. It is a labor-intensive project that takes a few days to dry and grout. Use a light-colored grout to keep the look modern. Avoid using the “fake” plastic brick panels from big box stores. They look cheap and will actually lower your home’s value.
21. Symmetrical Sconce Layout
Placing lighting in a strict symmetrical pattern creates a sense of order and calm. I suggest placing a pair of sconces exactly 60 inches apart over a sofa or a sideboard. It mimics the look of a high-end hotel suite. This works best when the lights are the same color as other hardware in the room.
Simple plug-in sconces can be found for $40 each. Use brass or matte black cord covers to keep the look clean. Symmetry is very pleasing to the human brain and makes a room feel more stable. Ensure the bulbs you use have the same color temperature so the light looks consistent on both sides.
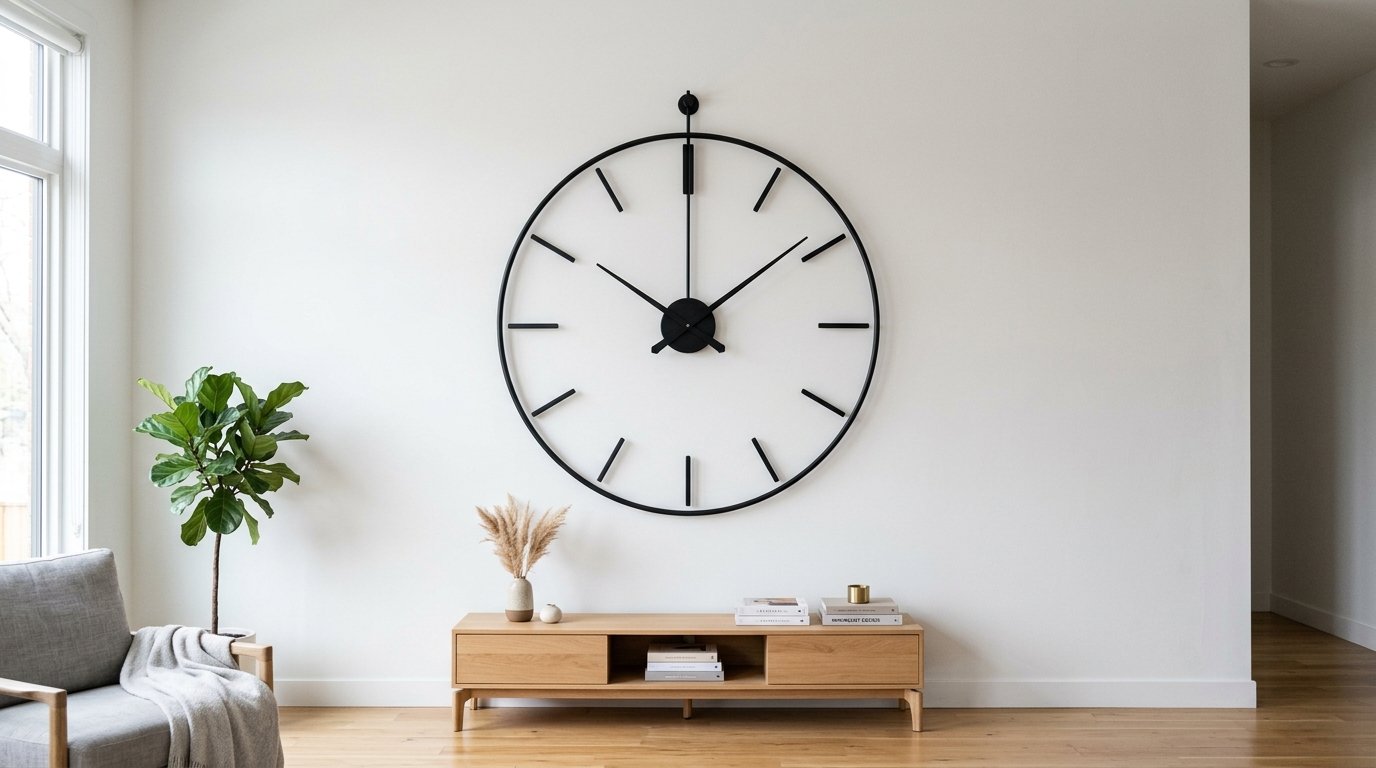
22. Statement Clock Placement
A very large wall clock can serve as both a functional tool and a piece of art. I prefer clocks that are at least 30 inches in diameter for a standard living room. It fills a large void on the wall and adds a vintage or industrial vibe depending on the material.
You can find large metal clocks for around $100. They are usually very light and can be hung with a single sturdy nail. Avoid clocks with loud ticking sounds in a living room where you watch TV or read. Look for “silent sweep” movements to ensure the room remains a quiet place to relax.
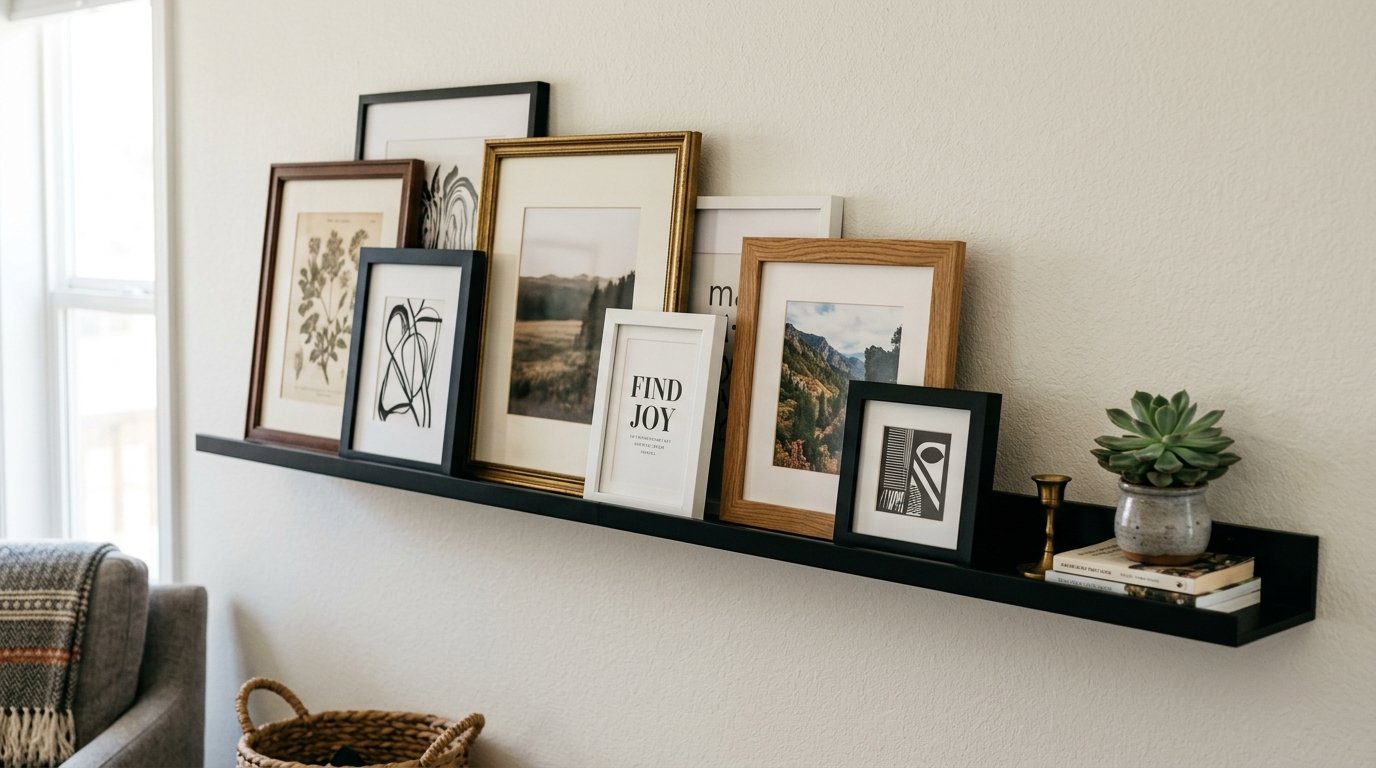
23. Minimalist Linear Ledge
A thin metal or wood ledge allows you to lean art rather than hanging it. This is perfect for people who like to change their decor frequently. I use these in my own home to display a mix of framed photos and small potted plants. It creates a casual and “collected” look.
A 4-foot ledge costs about $40. It requires just two screws into the wall studs. This is much safer than hanging multiple heavy frames. Avoid overlapping the frames too much. Leave a few inches between each piece so the ledge doesn’t look like a cluttered shelf of random items.
Frequently Asked Questions
What is the most affordable way to update a wall?
Paint is consistently the most budget-friendly option with the highest impact. A single gallon of high-quality paint costs under $100 and can completely change the mood of a room in four hours. If you want something more than just a solid color try a sponge technique or a simple stencil. These methods provide texture and pattern without the high cost of wallpaper or wood paneling. I have seen simple painted arches transform a boring corner for the price of a small can of sample paint.
Does an accent wall make a room look smaller?
It depends entirely on the color and the light. Dark accent walls actually create an illusion of depth which can make a room feel larger because the wall seems to recede into the distance. However a very busy pattern or a bright “warm” color like orange can make the wall feel like it is closing in on you. In my experience sticking to cool tones like blues greens or greys is the safest bet for maintaining a sense of space. Always consider the natural light coming from your windows before committing to a dark shade.
How high should I hang my wall decor?
The most common mistake people make is hanging art too high. The center of your artwork should be at eye level which is generally 57 to 60 inches from the floor. If you are hanging art above a sofa or a console table leave about 6 to 10 inches of space between the bottom of the frame and the top of the furniture. This creates a cohesive “unit” rather than having the art float aimlessly on the wall. I always recommend using a piece of painters tape to mark the center point before you hammer in any nails.
Are wood slat walls still in style?
Yes they are still a very popular choice for modern and mid-century modern designs. They provide a linear texture that contrasts well with soft furniture like velvet sofas or linen chairs. While some trends come and go natural wood is a timeless material that adds organic warmth to a home. If you are worried about the look becoming dated choose a light wood like oak or maple rather than a very dark or red-toned wood. Light woods are currently more versatile and align with contemporary Scandinavian and Japandi styles.
Can I install wall molding myself?
Absolutely. Modern materials like PVC molding or pre-primed MDF make this a very accessible DIY project. You do not need a professional carpenter if you have a simple miter box and a saw to cut 45-degree angles. Use construction adhesive to hold the pieces in place and then a few small finish nails to secure them while the glue dries. Caulking the edges where the molding meets the wall is the secret step that makes the project look professional. It hides any small gaps and makes the trim look like a seamless part of the wall.
Is wallpaper a good investment for resale?
High-quality wallpaper in a neutral pattern or a classic texture like grasscloth can definitely add value. However avoid very specific or loud patterns that might not appeal to a wide range of buyers. Peel-and-stick wallpaper is a great middle ground because it looks like the real thing but can be easily removed if a future buyer doesn’t like it. I have noticed that homes with “designer” wallpaper in the entryway or living room often sell faster because they look more “finished” and high-end in listing photos.
How do I choose between a mirror and art?
Consider the lighting and the view. If your room is dark a mirror will help bounce light from the windows and brighten the space. If the wall is opposite a beautiful view the mirror will reflect that view back into the room. On the other hand if the wall is in a well-lit area and you want to introduce color or a specific mood art is the better choice. I often suggest using both in the same room on different walls to balance the light and the visual interest.
What tools do I need for a gallery wall?
You will need a hammer a level a pencil and a measuring tape. For a truly professional result I highly recommend using a laser level. This projects a straight line across the wall so you can align the tops or bottoms of your frames perfectly. Another great tip is to cut out paper templates of your frames and tape them to the wall first. This allows you to play with the arrangement without making a single hole in the drywall. It saves a lot of stress and prevents unnecessary repairs later.
How much does professional wall paneling cost?
A professional contractor will likely charge between $1,500 and $5,000 for a standard living room wall depending on the complexity of the design. This includes the cost of materials labor and painting. While this is a significant investment it is often one of the highest-ROI projects you can do for your home. Architectural details are what distinguish a “luxury” home from a standard build. If you are on a tight budget doing the labor yourself can save you at least 60% of that total cost.
Can I use these designs in a rental?
Many of these ideas can be adapted for renters. Floating shelves can be installed with heavy-duty Command hooks in some cases though screws are always safer. Peel-and-stick wallpaper and vinyl decals are designed specifically for temporary use and leave no residue. You can also lean large pieces of art or mirrors against the wall instead of hanging them. This provides the same visual impact without any damage to the walls. Just be sure to check your lease agreement before making any semi-permanent changes like painting.
How do I hide TV wires on a gallery wall?
The best way to hide wires is to run them behind the drywall using an in-wall cable management kit. If you cannot cut into the wall use a paintable cord cover. These are plastic channels that stick to the wall and can be painted the exact same color as your wall. If you incorporate your TV into a gallery wall you can also use other frames and decor to physically block the view of the cords. I have seen people use a “Frame TV” which looks like a piece of art when it is off and has a very thin nearly invisible cord.
What is the best wall design for high ceilings?
High ceilings can make a room feel empty if the decor is too small. Use vertical elements like floor-to-ceiling built-ins or long vertical wood slats to draw the eye upward. Large-scale art is also a must. A single massive piece is much more effective than a cluster of small items that get lost in the vast space. You can also paint the ceiling a slightly darker color than the walls to “bring it down” and make the room feel more cozy and intimate.
Conclusion
Transforming your space with thoughtful living room wall designs is one of the most rewarding home projects you can undertake. Whether you choose the structural elegance of picture molding or the soft texture of a limewash finish these updates provide long-term value and daily inspiration. I have seen how small changes like these can completely transform a space from a simple room into a true reflection of the people who live there. Start with one idea that resonates with your style and watch how it changes the entire energy of your home. Save this post on Pinterest and try one of these setups this weekend to see the impact for yourself.