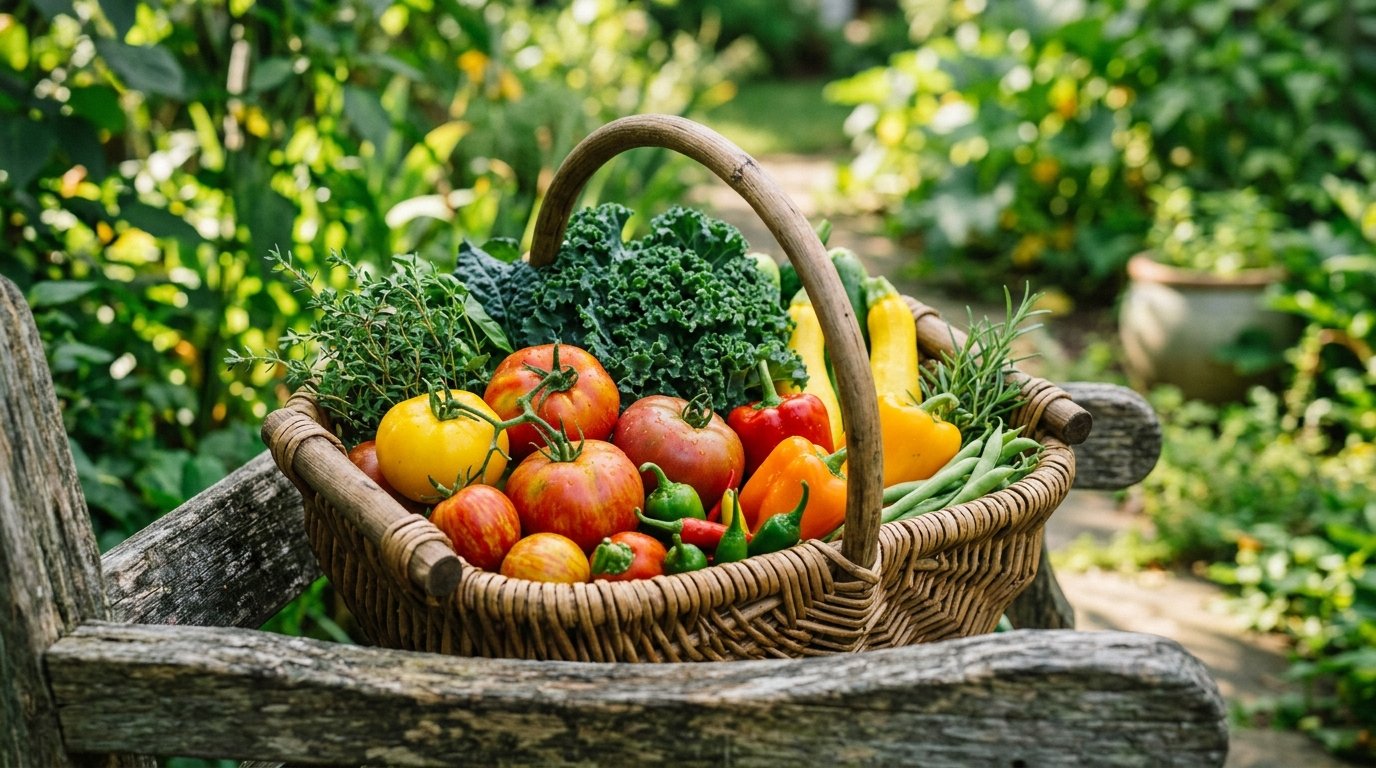
Last July, I stood in a local market staring at a $6 bundle of half-dead mint. That moment changed my backyard forever. Why pay premium prices for greens that wilt before you get home? Growing a kitchen garden isn’t just about food; it’s about reclaiming your grocery budget and flavor. In my experience, even a tiny balcony offers enough space to slash your monthly food spending. I’ve seen families save $300 a season just by swapping store-bought herbs for home-grown varieties.
Executive Summary
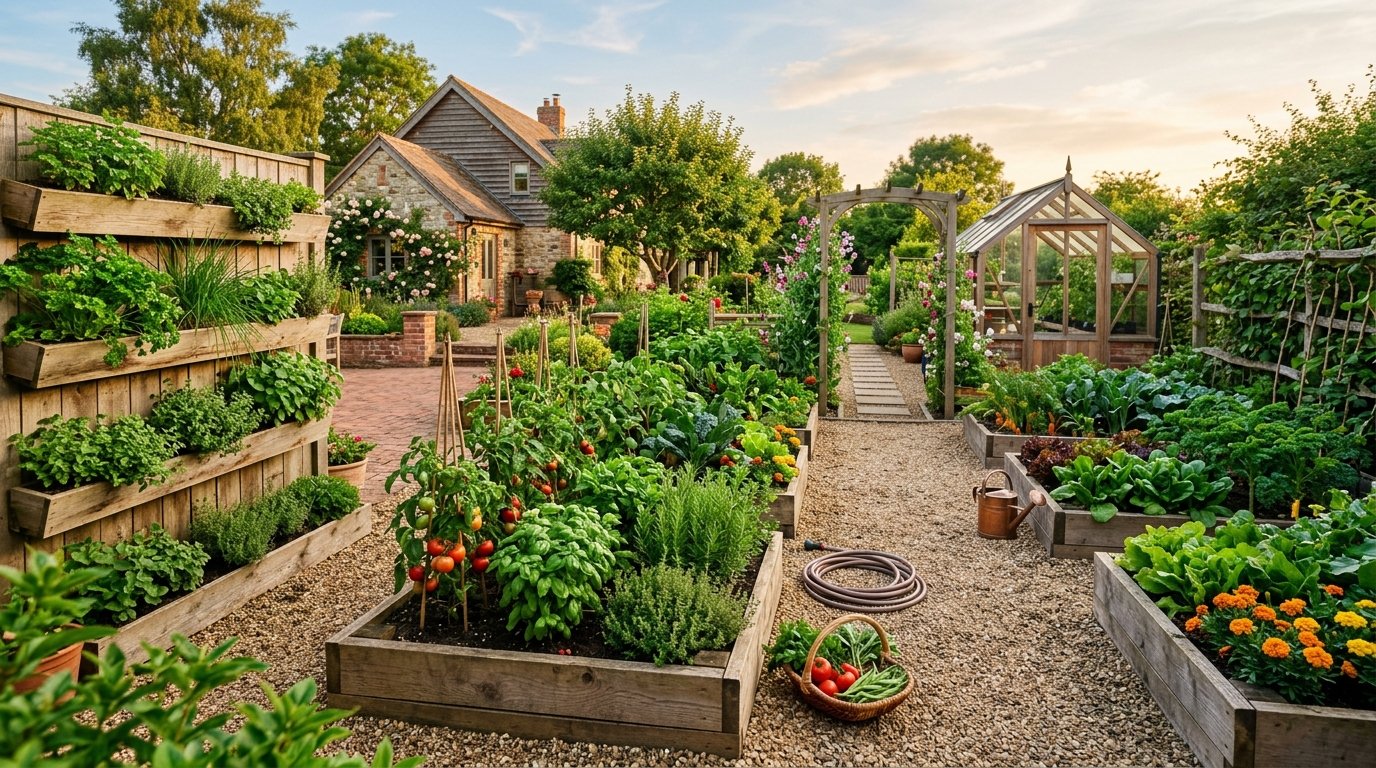
This guide provides a blueprint for creating a high-yield edible space that pays for itself within the first sixty days. You will find 23 distinct strategies to maximize your harvest regardless of your yard size or skill level. We cover everything from vertical herb systems to seasonal crop rotation with a focus on measurable financial returns. Expect to learn how to save $1,000 annually by targeting high-cost supermarket items like organic berries, fresh greens, and culinary herbs. We focus on practical, low-maintenance setups using affordable materials from brands like Burpee and Gardena. This guide excludes large-scale farming techniques, focusing instead on suburban and urban setups that fit into a busy lifestyle.
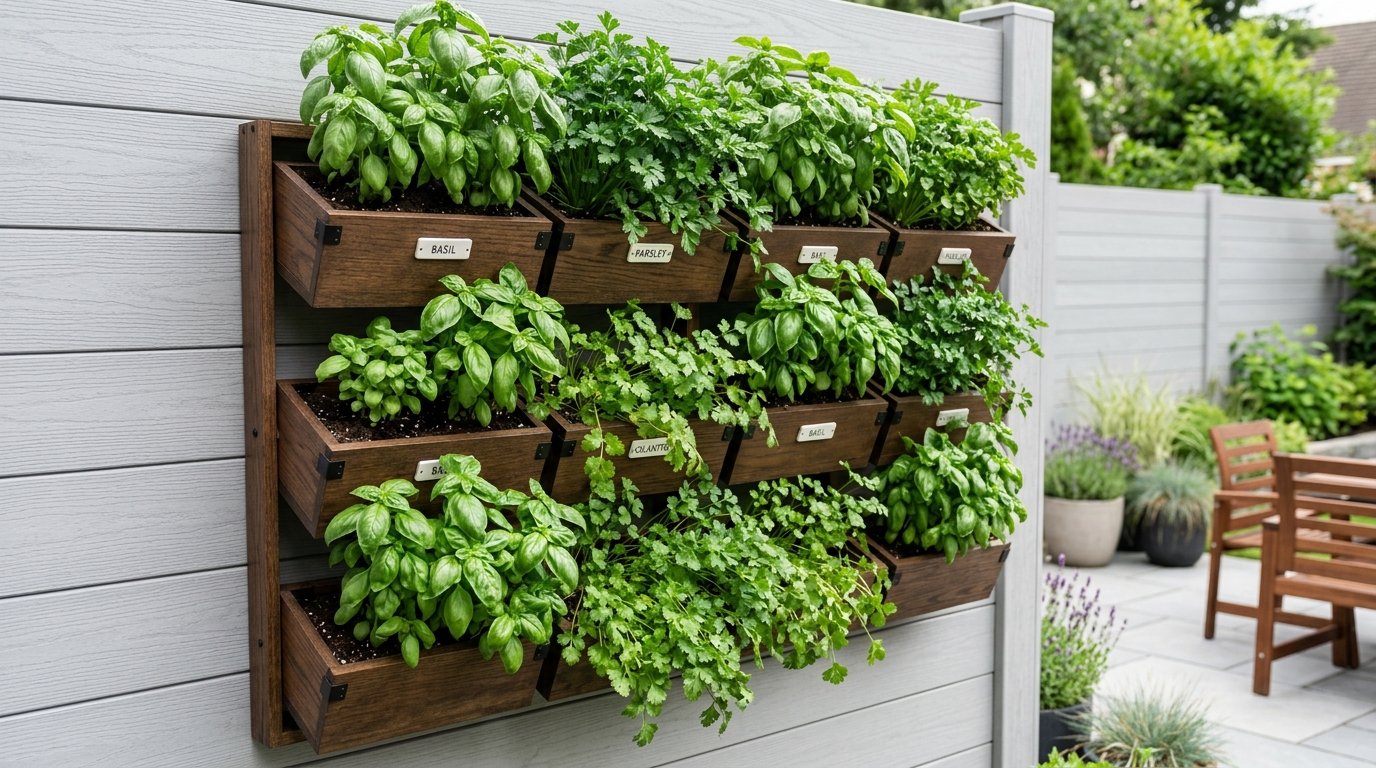
1. Vertical Herb Wall
Building upward is the fastest way to grow a high-value harvest in a small footprint. I’ve noticed that most people waste fence space that could easily hold twenty different basil plants. You can use a modular system like the Floridis Vertical Planter which costs about $45 and mounts directly to any flat surface. Start by mounting the brackets and filling them with a high-quality potting mix. This setup saves you roughly $15 every week on fresh herbs for pasta and salads. A common mistake is using heavy clay soil which prevents drainage in vertical pockets. Always stick to lightweight coconut coir or perlite mixes to keep the structure secure.
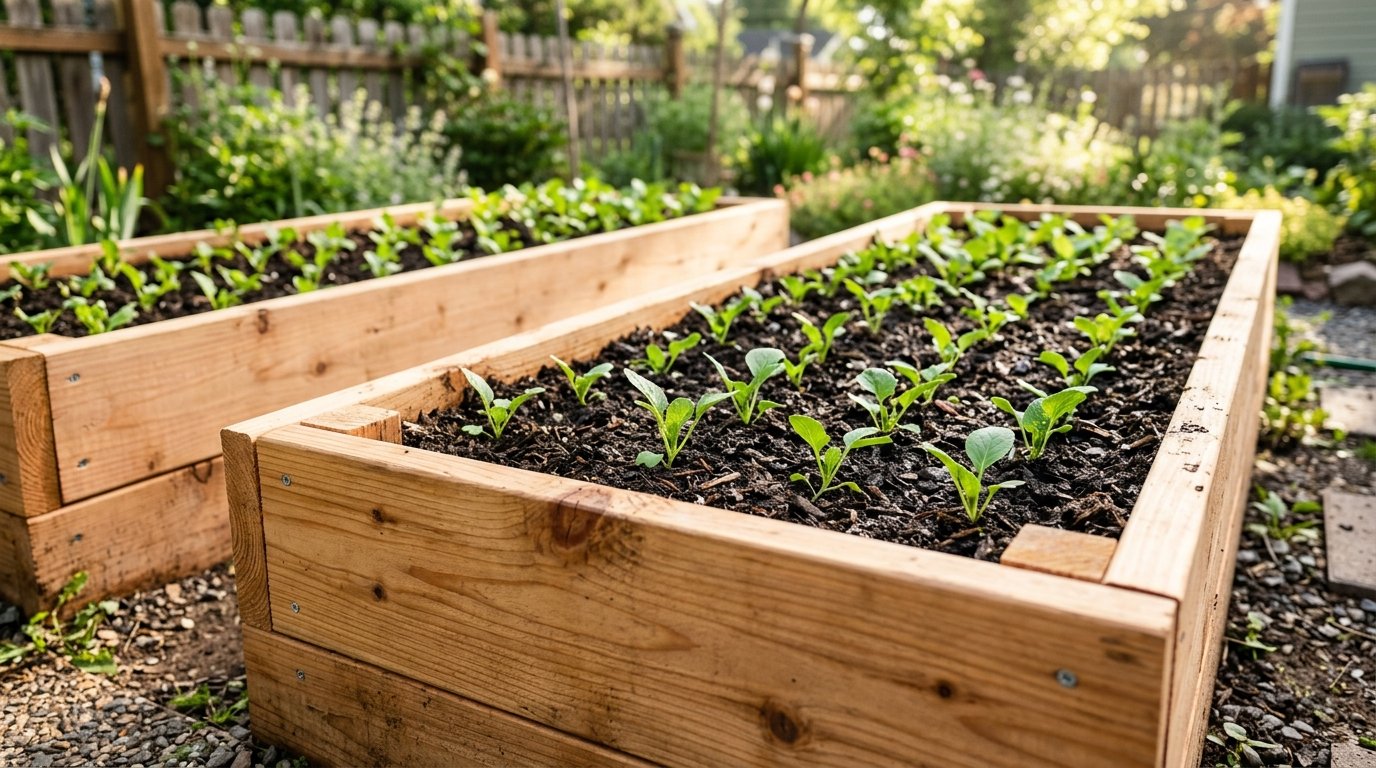
2. Raised Cedar Beds
Cedar is the gold standard for edible plots because it naturally resists rot without toxic chemicals. A standard 4×8 foot bed made from 2×6 cedar boards from Home Depot usually runs about $120 in materials. In my experience, these beds warm up faster in the spring, giving you a two-week head start on the growing season. Assemble the frame using exterior-grade screws and line the bottom with cardboard to kill off grass. This setup allows you to control the soil quality perfectly, which is vital for heavy feeders like tomatoes. One contrarian note: don’t buy the most expensive “organic” soil bags; make your own mix of compost and peat for half the price.
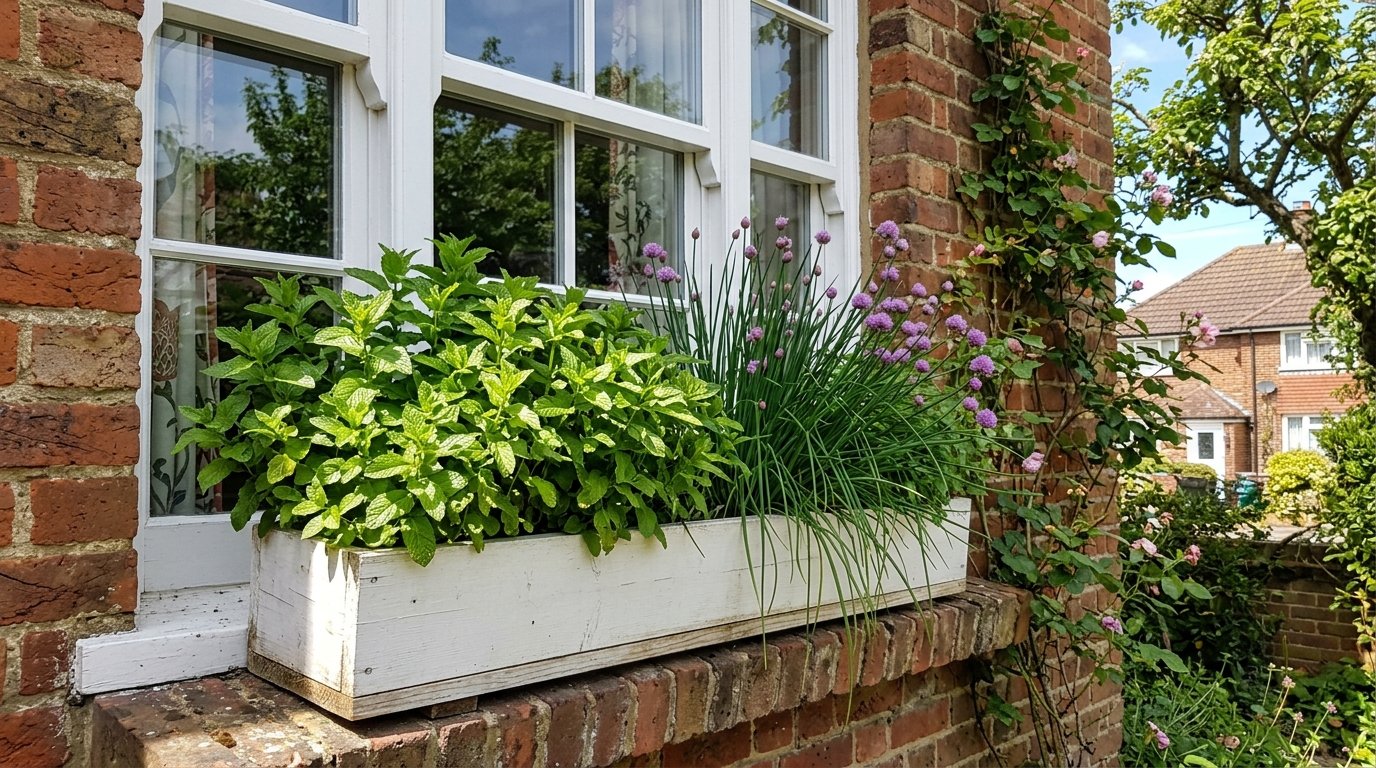
3. Window Sill Boxes
If you have zero outdoor space, your windows are your best asset for a miniature kitchen garden. A simple 24-inch plastic or wooden box costs less than $20 and fits perfectly on most ledges. I have seen great success with small-leaf varieties like Spicy Globe basil or chives which thrive in confined spaces. Use a liquid fertilizer like Miracle-Gro Performance Organics every two weeks to keep the plants productive. The biggest error here is overwatering; without wind to dry the soil, roots can rot in days. Always check the soil moisture with your finger before adding more water.
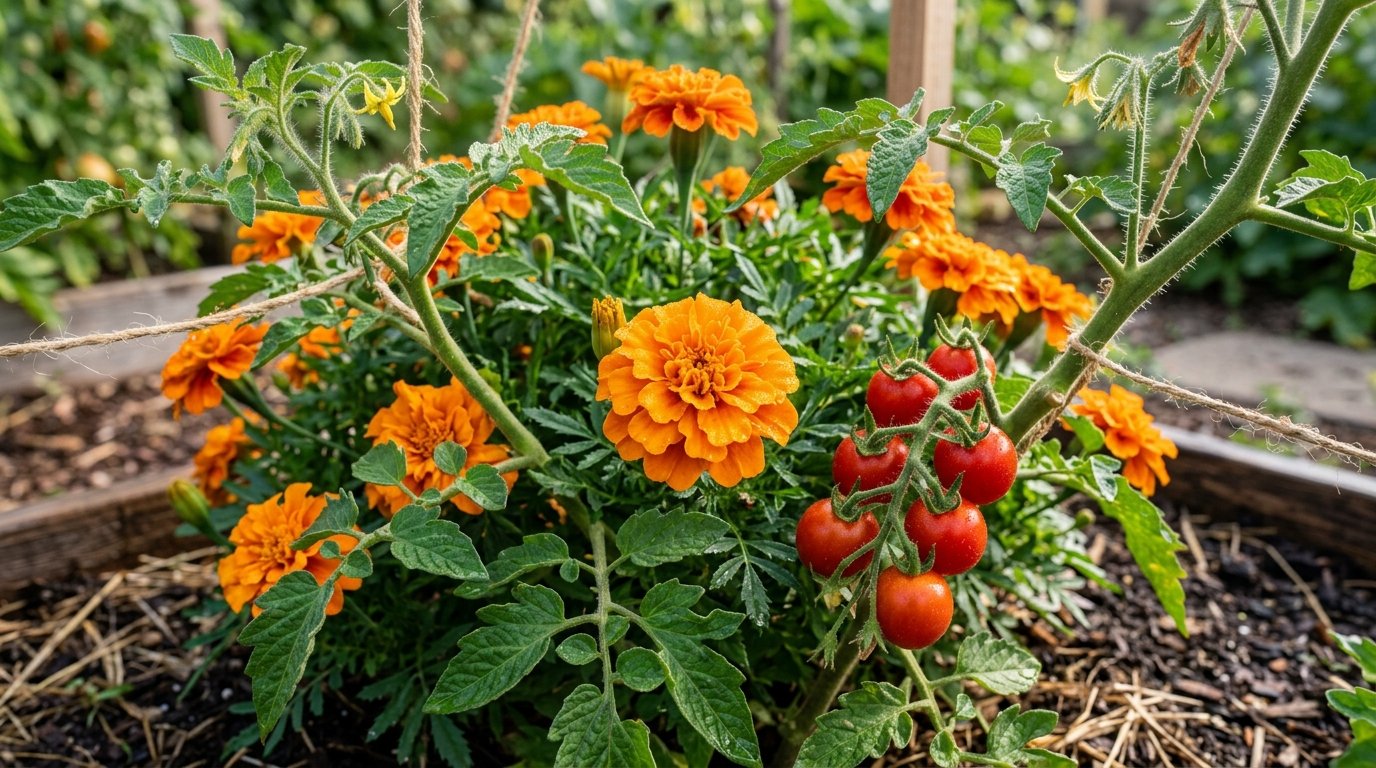
4. Companion Planting Pairs
Strategic pairing reduces your need for expensive organic pesticides and improves flavor naturally. Planting marigolds next to your tomatoes creates a chemical barrier that confuses hornworms and aphids. This method costs as little as $3 for a packet of seeds but can save a $50 tomato harvest from total destruction. I’ve tried this with basil and tomatoes too; the basil actually improves the sugar content of the fruit. Some people think companion planting is folklore, but the biological reality of root exudates is well-documented. Avoid planting onions near peas, as they can stunt the growth of the nitrogen-fixing vines.
5. Edible Border Edging
Swap your purely decorative hostas for leafy greens like Swiss Chard or kale along your walkways. This double-duty landscaping looks beautiful and provides a constant source of smoothies and salads. I’ve noticed that “Bright Lights” Swiss Chard adds vibrant pink and yellow stems to the garden that look better than most flowers. A flat of 12 starts costs about $15 and will produce leaves until the first hard frost. This saves you roughly $4 per bunch at the store. The catch is that rabbits love these borders, so you might need a low 6-inch wire fence to protect your investment.
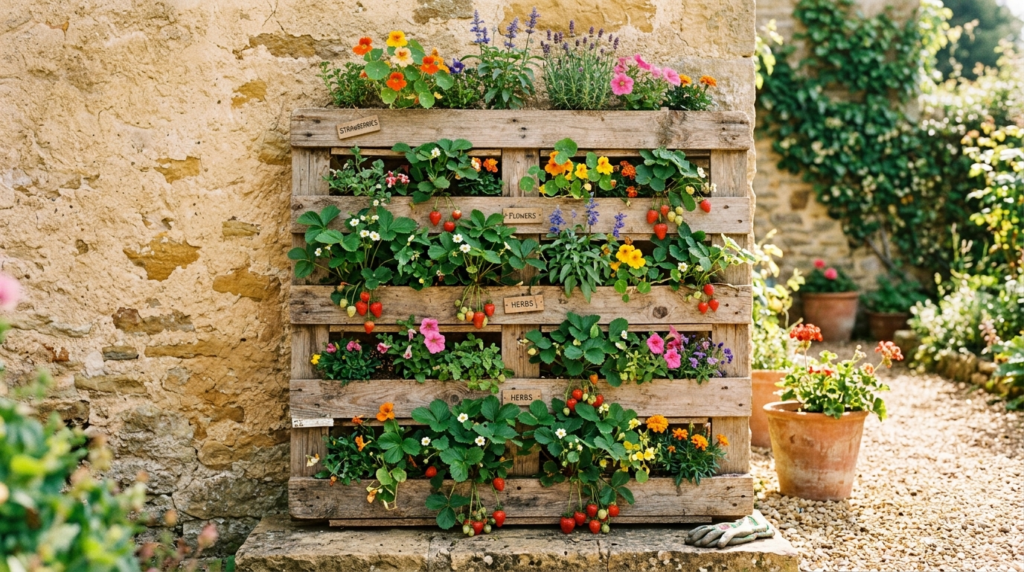
6. Recycled Pallet Planters
You can often find heat-treated pallets for free behind hardware stores or warehouses. These make excellent strawberry towers or lettuce racks when lined with landscape fabric. I’ve used these to grow thirty strawberry plants in a two-square-foot area, yielding roughly five pounds of fruit per season. This effectively pays back the $10 spent on fabric and soil in the first month. Make sure the pallet is marked with “HT” for heat-treated, as pallets marked “MB” are treated with toxic methyl bromide. People often forget to water the bottom rows, so install a simple soaker hose inside the pallet for even moisture.
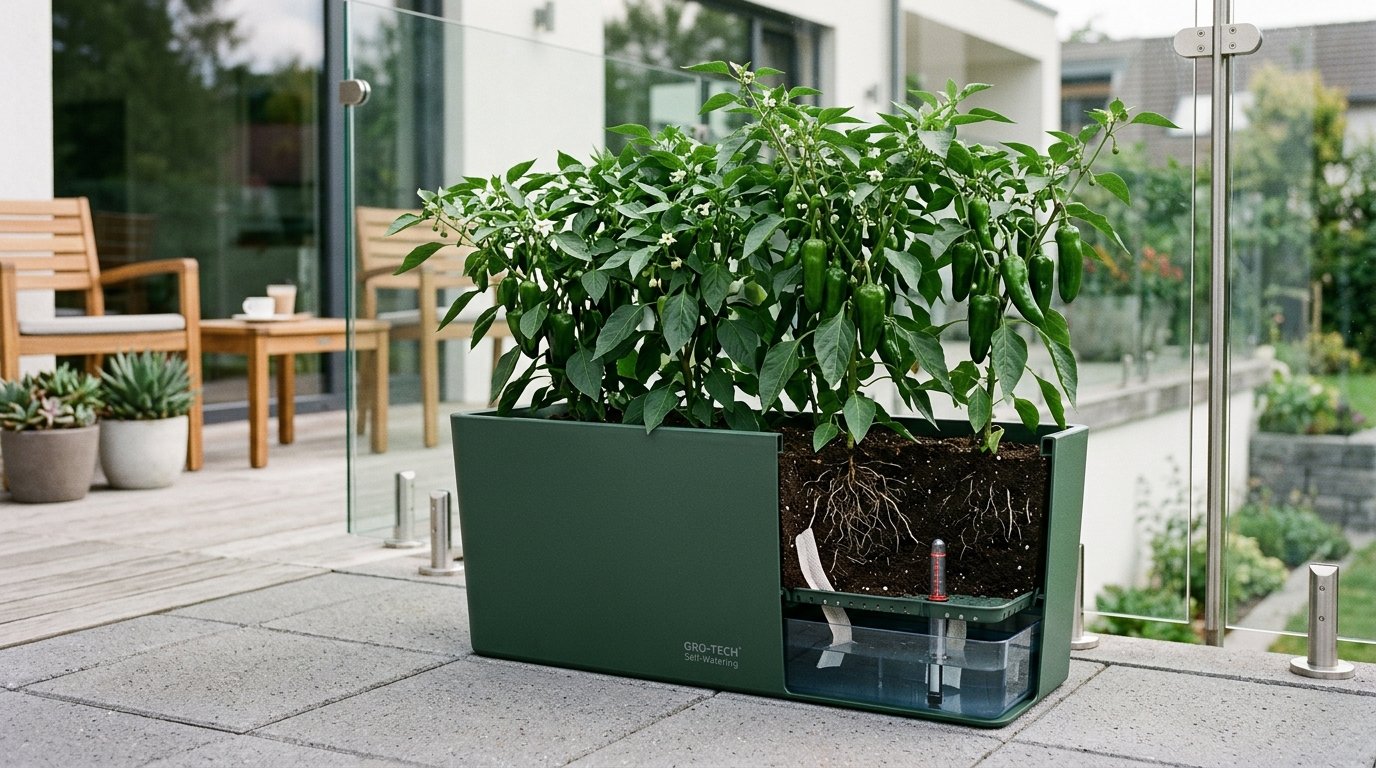
7. Self-Watering Systems
Consistent moisture is the secret to preventing bitter greens and cracked tomatoes. Sub-irrigated planters like the EarthBox cost around $35 and use a reservoir to feed plants from the bottom. In my experience, this reduces water waste by 60% and increases yield because the plants never face drought stress. Fill the reservoir every three to four days depending on the heat. The initial cost is higher than a standard pot, but the time saved on manual watering is worth at least $200 in labor over a summer. Do not use these for succulents or Mediterranean herbs like rosemary that prefer to dry out between waterings.
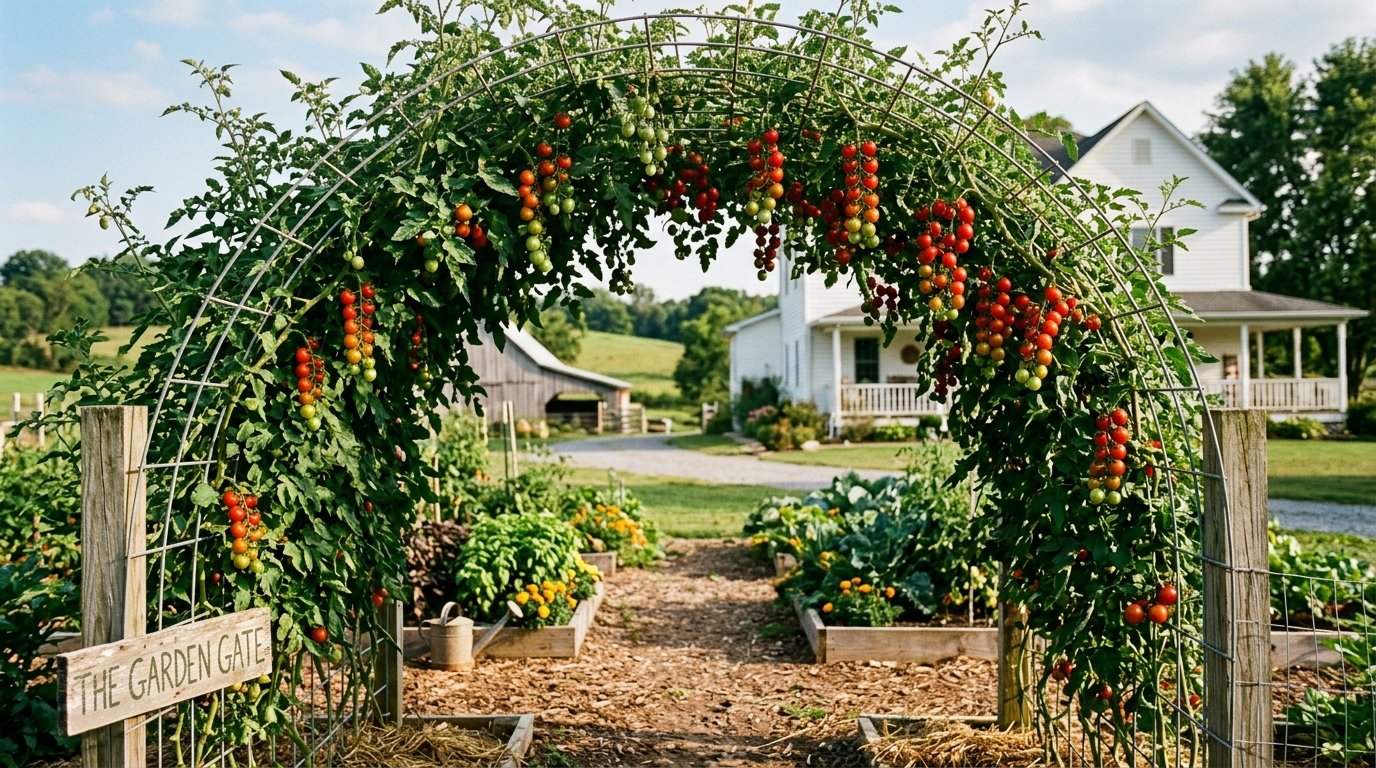
8. Heirloom Tomato Trellis
Growing vertically keeps your fruit off the ground and away from slugs and rot. A sturdy cattle panel trellis from a farm supply store like Tractor Supply costs about $25 and will last a decade. I’ve seen this setup support four massive heirloom plants that produced over 80 pounds of fruit in a single season. At $4 per pound for organic heirlooms, that is a $320 return on a $25 investment. Use soft garden twine to tie the main stems as they grow. The contrarian view here is that “suckering” or pruning isn’t always necessary; sometimes more foliage protects the fruit from sunscald.
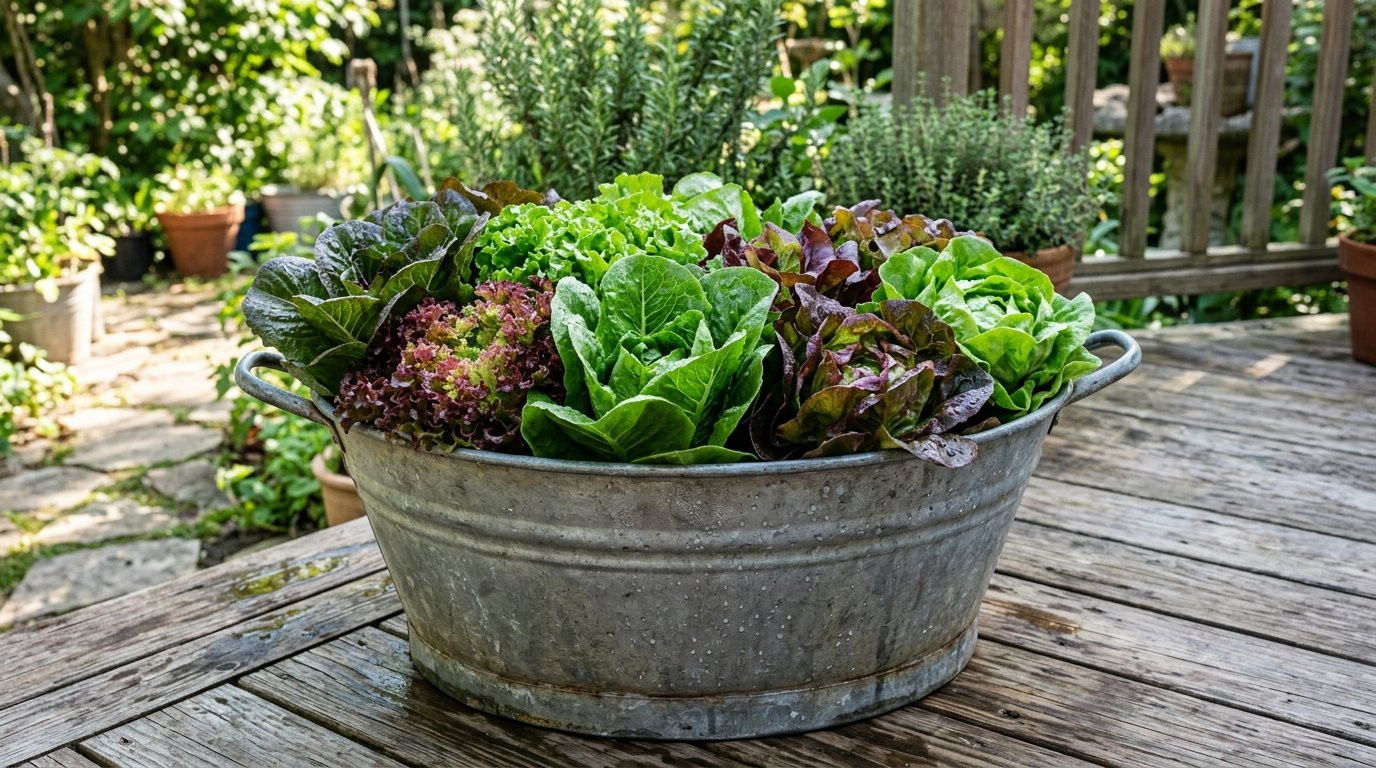
9. Perpetual Salad Tub
You can grow a never-ending supply of mixed greens in a single 15-gallon galvanized tub. I’ve noticed that “Cut and Come Again” seed mixes from brands like Johnny’s Selected Seeds allow for three to four harvests from the same plant. A tub costs $30 and the seeds are $5. This setup replaces those $7 plastic tubs of pre-washed greens that rot in three days. Sow a new row of seeds every two weeks to ensure a continuous supply. A common mistake is letting the plants “bolt” or go to seed in the heat; keep them shaded during July afternoons to prolong the harvest.
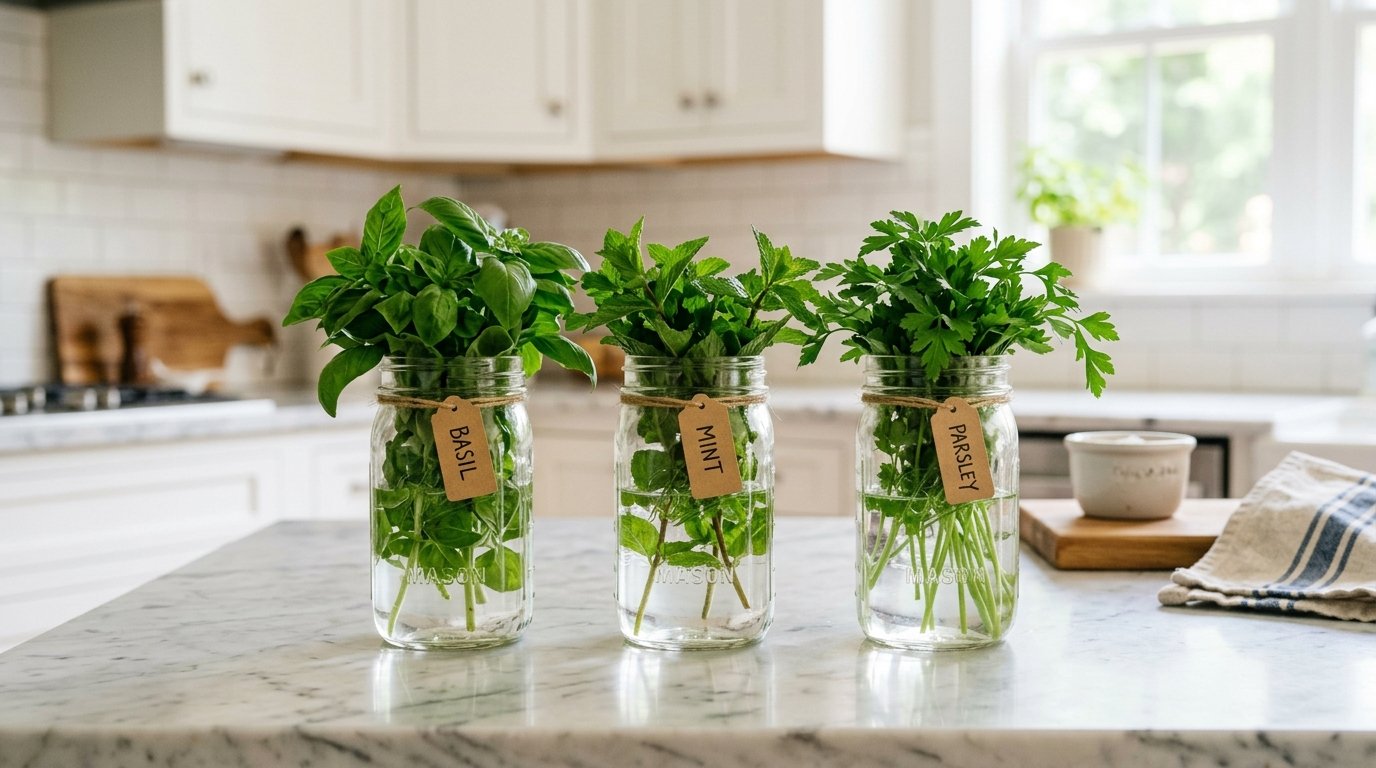
10. Mason Jar Herbs
For a clean, Pinterest-worthy look, use wide-mouth quart jars on a sunny kitchen counter. This setup is perfect for water-rooting herbs like mint, basil, and green onions. I’ve tried this with grocery store scraps; simply place the white bottom of a green onion in an inch of water and watch it regrow. Total cost is zero if you recycle old jars. It provides a quick pinch of flavor for your cooking without a trip to the store. Change the water every two days to prevent bacterial growth and odors. This method won’t yield pounds of food, but it is the easiest way to start an edible plot.
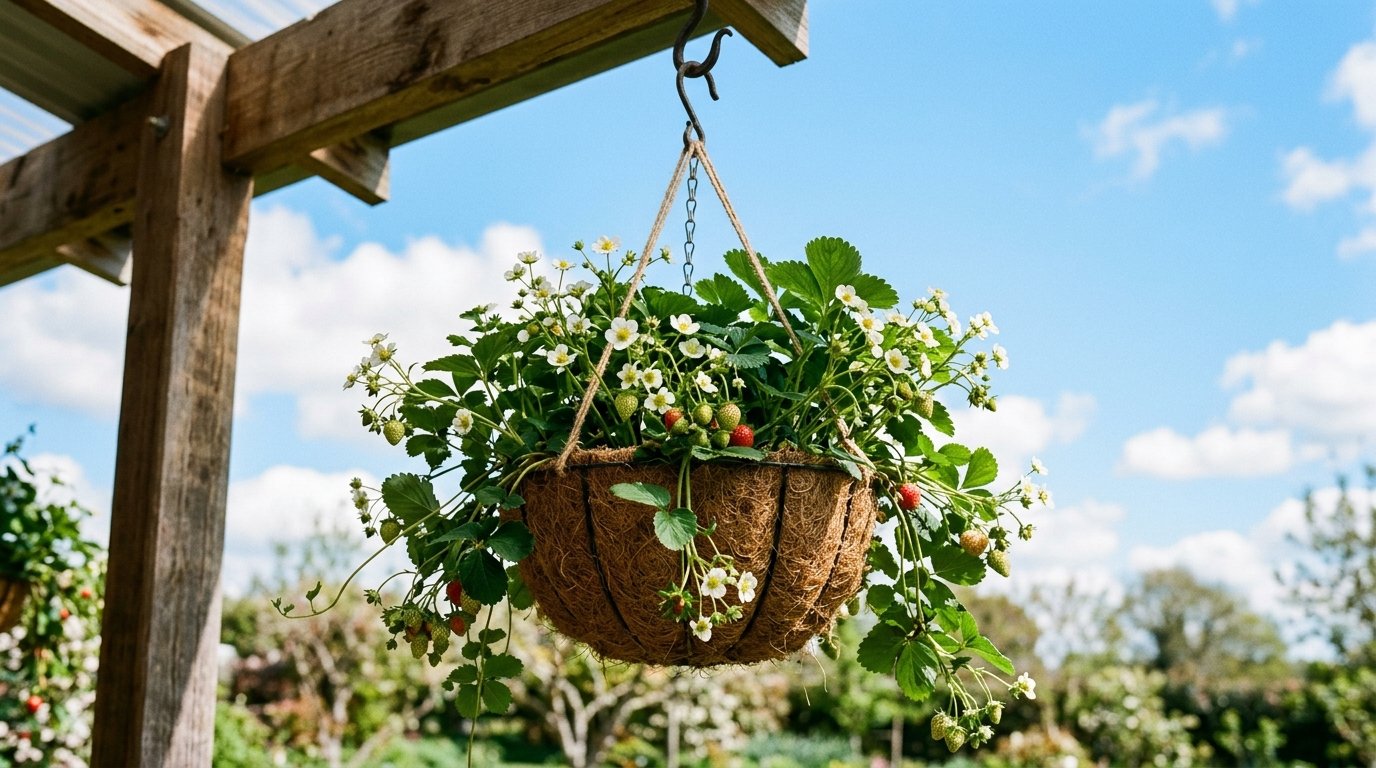
11. Hanging Basket Strawberries
Keeping fruit elevated protects it from soil-borne pests and makes harvesting easier on your back. A 12-inch coconut fiber hanging basket costs about $15 and can hold three to four “Everlasting” strawberry plants. I’ve seen these produce fruit from June until October if they are fed regularly. This setup is ideal for balconies or small porches where ground space is limited. Ensure you hang them in a spot that gets at least six hours of direct sun. Most people forget that hanging baskets dry out much faster than ground soil; you must water them daily during heatwaves.
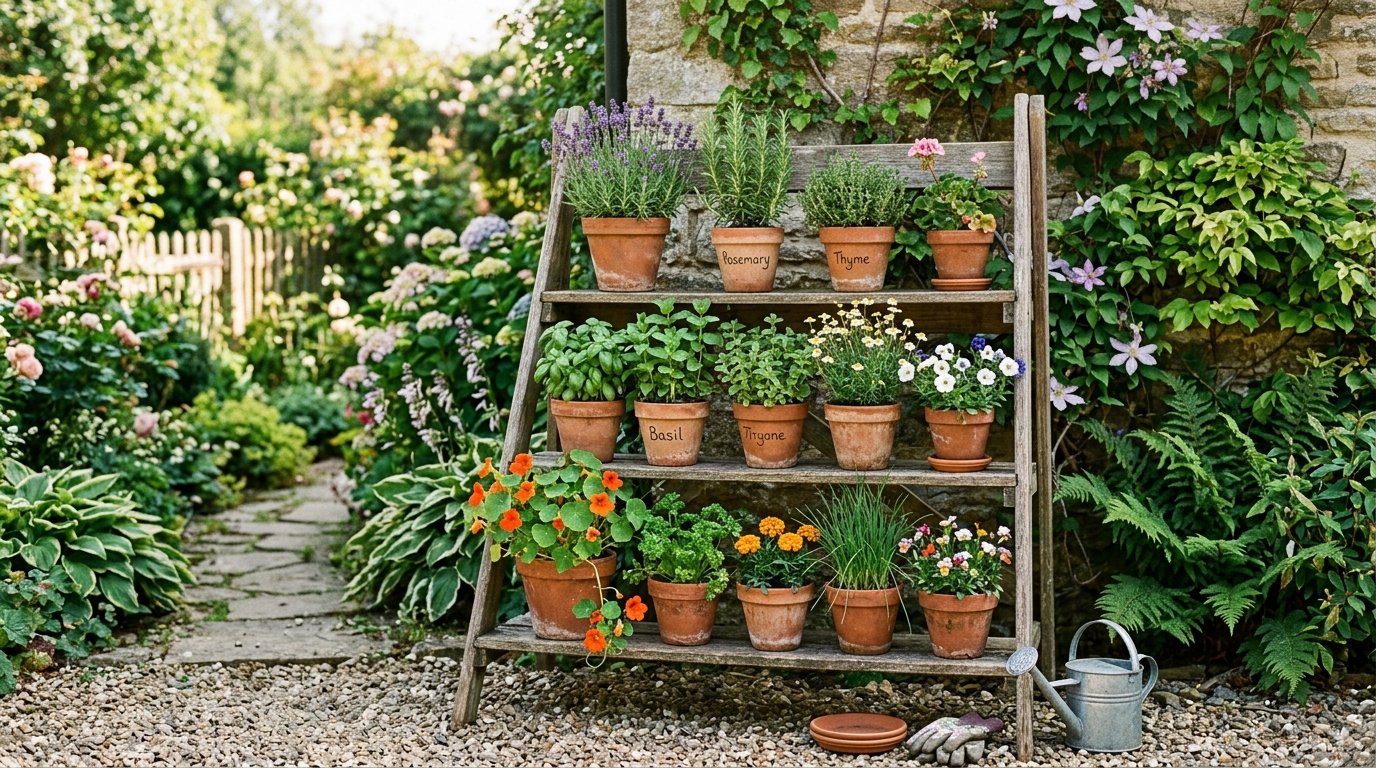
12. Stepped Ladder Garden
A tiered wooden ladder allows you to create different microclimates for various plants in one small area. Put the sun-loving peppers on the top step and the shade-tolerant spinach on the bottom. You can build a simple cedar version for about $40 in lumber or buy a pre-made metal frame for $60. This maximizes vertical space and adds a structural focal point to your yard. I’ve noticed that this setup helps with air circulation, which prevents powdery mildew on zucchini leaves. The downside is that the top pots will need more frequent watering than the bottom ones.
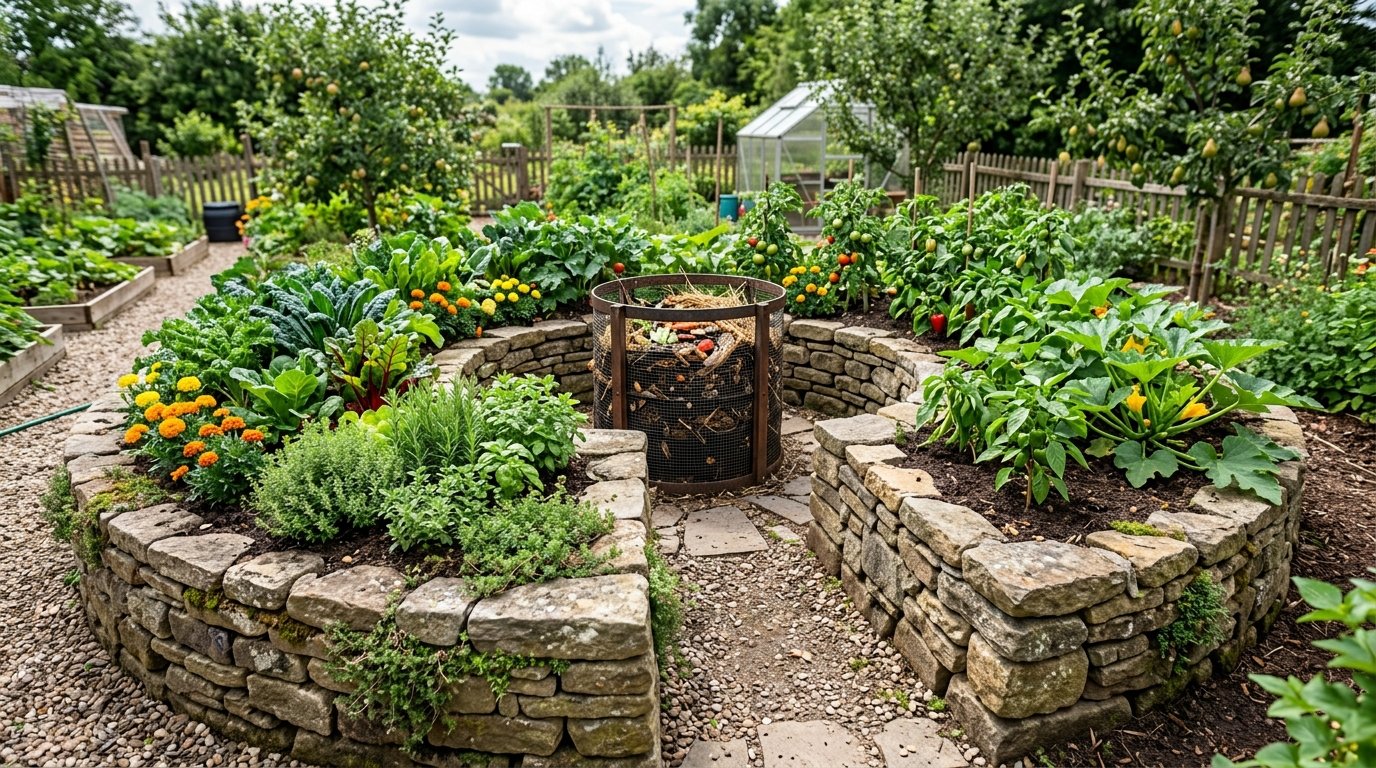
13. Keyhole Garden Layout
This African-inspired design features a central compost basket that feeds nutrients directly into the surrounding soil. It is a circular raised bed with a small wedge cut out for access, costing about $80 to build with stones or bricks. I’ve seen these thrive in poor soil conditions because the internal composting system provides constant fertilization. You can drop your kitchen scraps directly into the center while you harvest your kale. It is a highly efficient, self-sustaining loop. Some find the look too “rustic,” but the yield per square foot is higher than almost any other traditional row method.
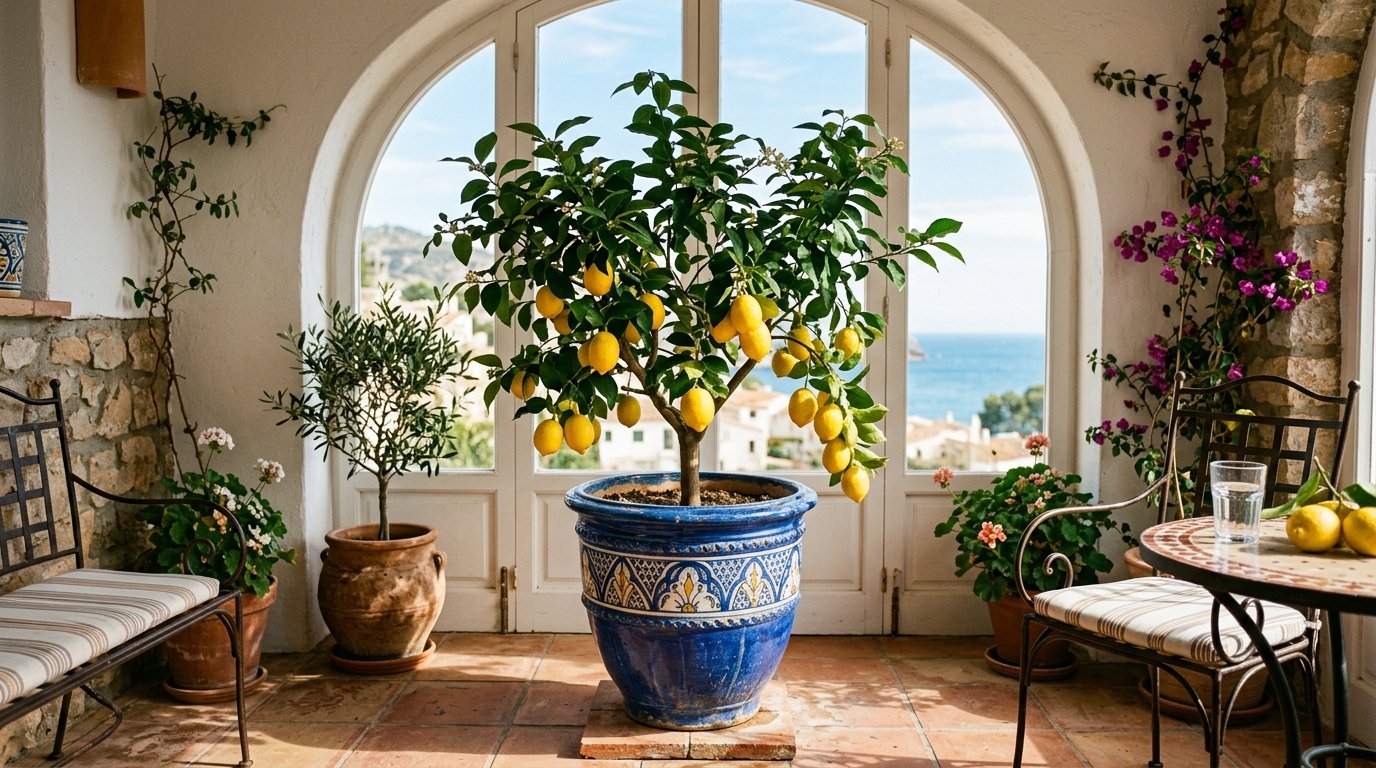
14. Potted Citrus Trees
If you live in a colder climate, dwarf citrus trees in large pots allow you to have fresh lemons or limes even in winter. A Meyer Lemon tree usually costs $50 but can produce twenty to thirty fruits a year once established. Considering organic lemons are often $1 each, the tree pays for itself in two years. Move the pot indoors near a south-facing window when temperatures drop below 40 degrees. Use a specific citrus fertilizer like Espoma Citrus-tone to prevent yellowing leaves. A common mistake is using a pot without enough drainage holes; citrus roots hate sitting in soggy soil.
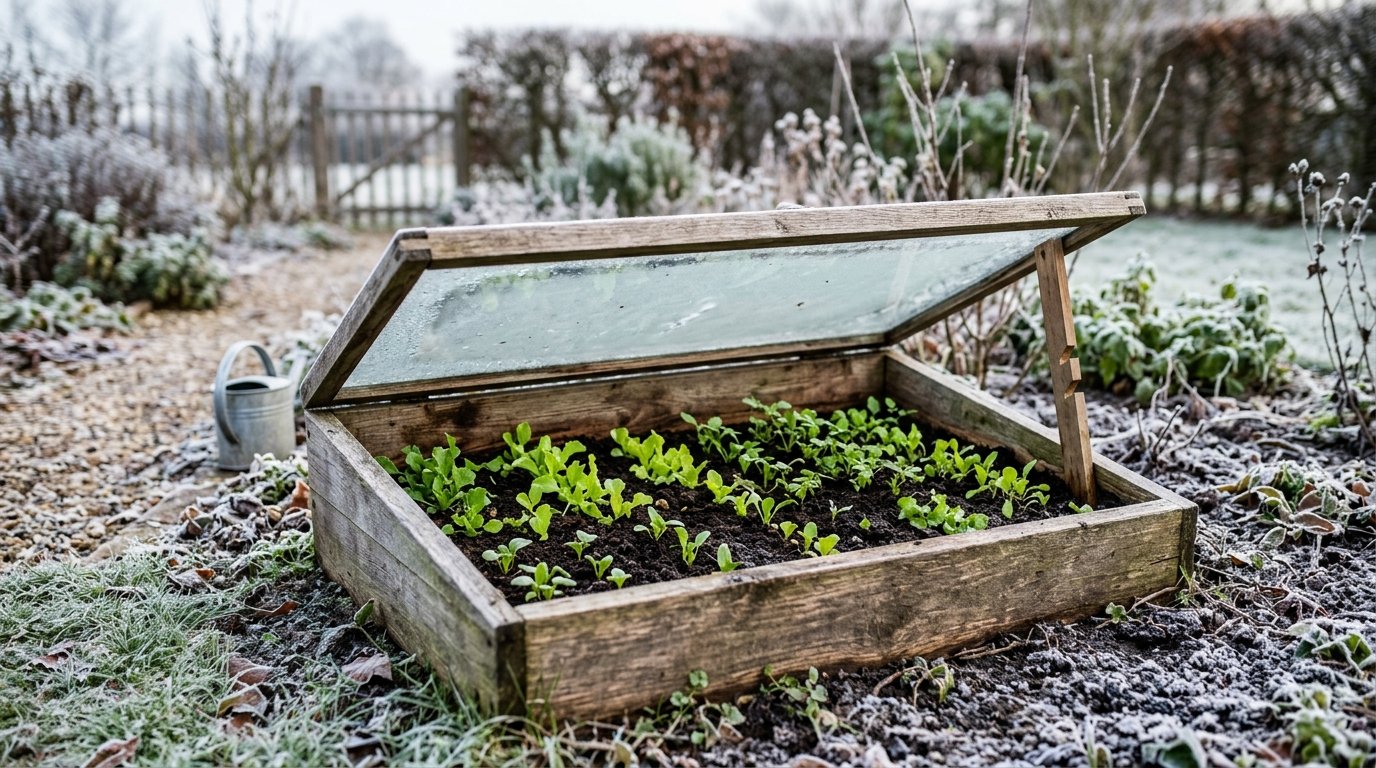
15. Greenhouse Cold Frames
Extend your growing season by two months on both ends with a simple glass or plastic topped box. You can build these using old windows found on Facebook Marketplace for free and some scrap wood. I’ve harvested fresh carrots and leeks in January using a well-insulated cold frame. This allows you to bypass the high winter prices of imported produce. The cost of materials is usually under $20. Make sure to prop the lid open on sunny days, as temperatures inside can soar to 100 degrees even when it is 40 degrees outside, which will cook your plants.
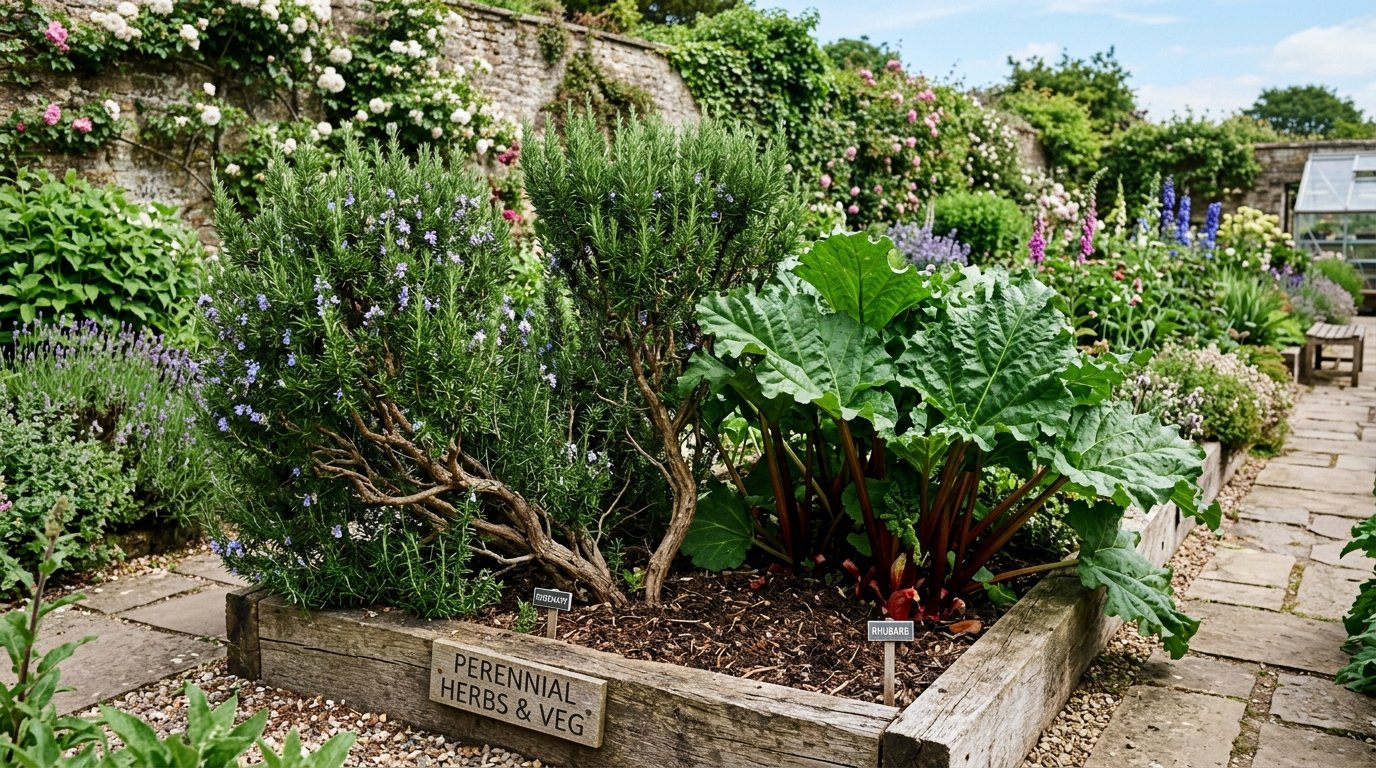
16. Culinary Perennial Patch
Plants that come back every year, like asparagus, rhubarb, and rosemary, are the best long-term investments. While the initial “crowns” or plants might cost $30 to $50 to establish, they will produce food for twenty years with minimal effort. I’ve noticed that a well-established rosemary bush can replace those $4 plastic clamshells of herbs permanently. Plant these in a dedicated corner so you don’t accidentally dig them up when planting annuals. The contrarian take: don’t harvest anything in the first year; let the roots establish so you get massive yields in years three through twenty.
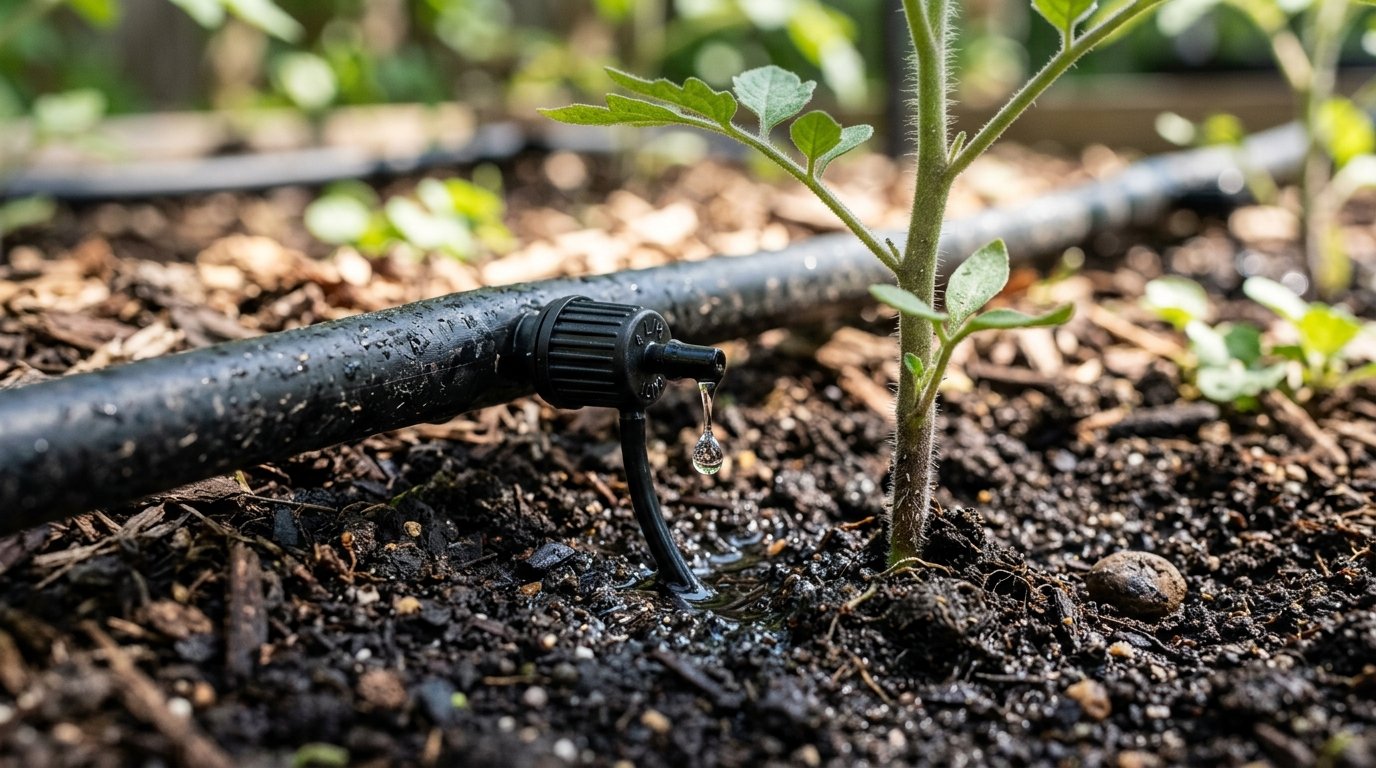
17. Drip Irrigation Grid
Hand watering is the number one reason people quit gardening. A basic drip irrigation kit from a brand like Rain Bird costs about $40 and can be set on a $20 timer. This ensures your kitchen garden gets exactly the right amount of water at 5:00 AM every day. I’ve seen this reduce water bills by 40% because it delivers water to the roots, not the leaves or the air. This also prevents fungal diseases that thrive on wet foliage. It takes about two hours to set up initially, but it saves you hundreds of hours over the summer.
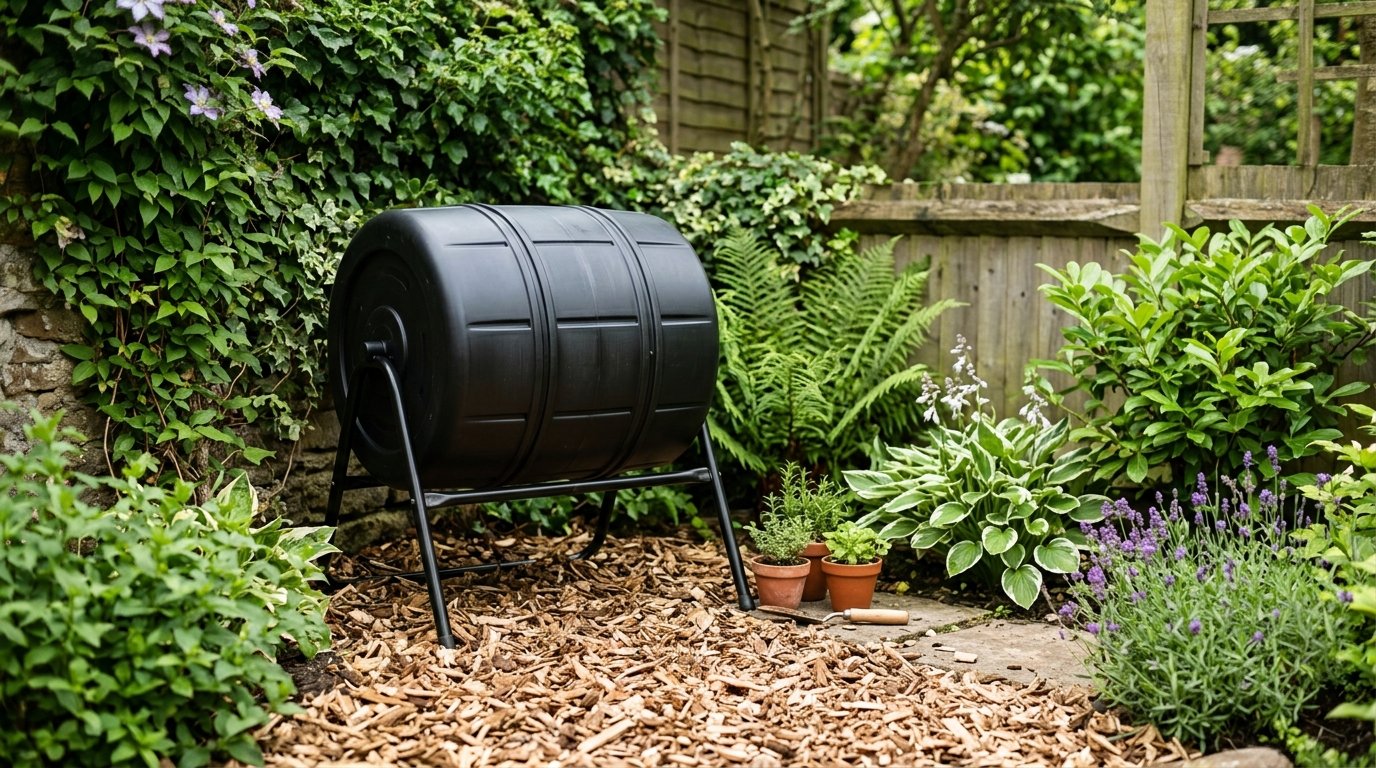
18. Compost Bin Integration
Turning your kitchen scraps into “black gold” eliminates the need to buy $10 bags of fertilizer. A simple plastic tumbler costs about $70, or you can build a wire bin for $10. I’ve seen that adding home-made compost to a vegetable patch doubles the size of the harvest compared to using chemical fertilizers alone. It keeps food waste out of landfills and puts nutrients back into your soil. The key is a balance of “greens” (scraps) and “browns” (leaves/paper). People worry about the smell, but a healthy compost pile should smell like fresh rain, not garbage.
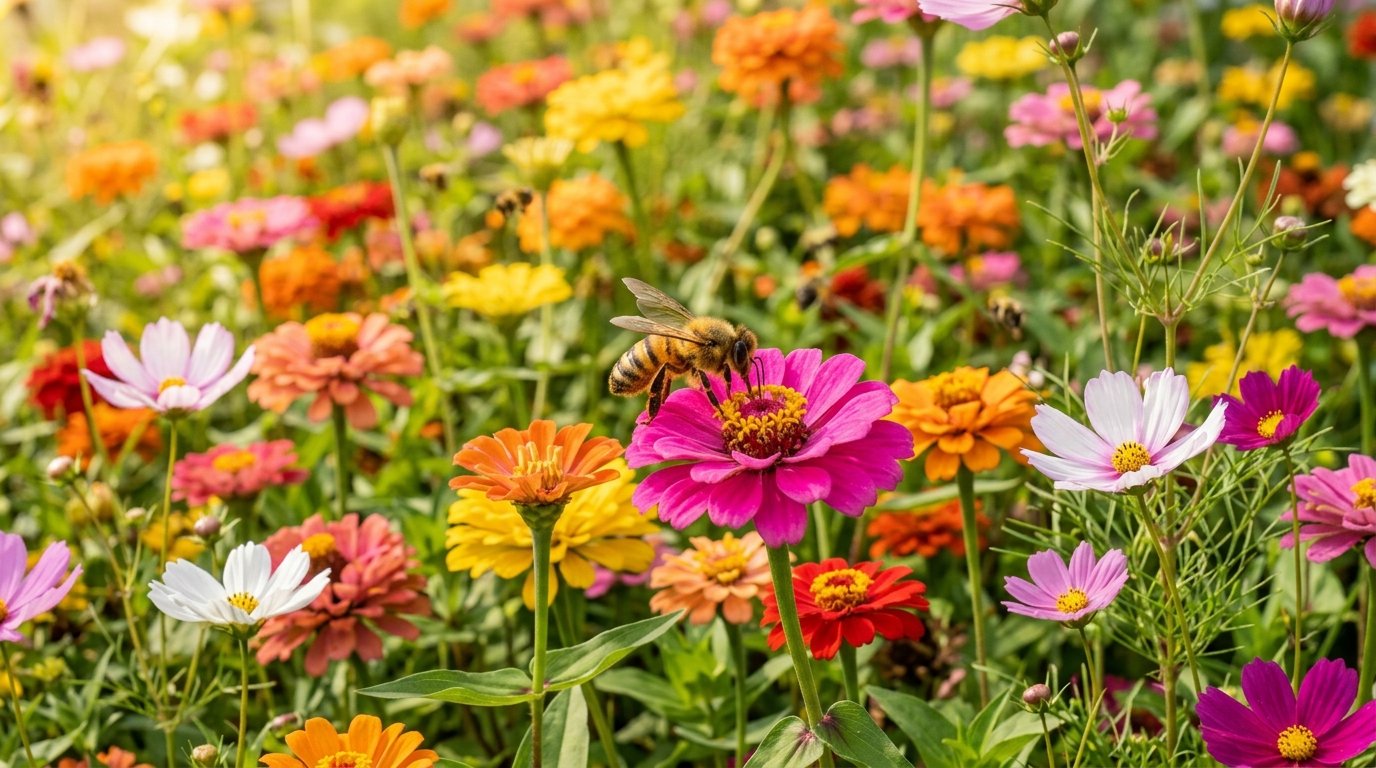
19. Pollinator Flower Mix
Dedicate 10% of your space to flowers like zinnias and cosmos to attract bees and butterflies. Without these insects, your zucchini and cucumbers will fail to produce fruit. A $5 bag of wildflower seeds can increase your vegetable yield by 30% through better pollination. I’ve noticed that a “messy” garden with plenty of flowers is always more productive than a sterile, perfectly weeded one. This also provides fresh-cut flowers for your home, saving you another $15 a week on florist bouquets. Don’t use pesticides on these flowers, or you’ll kill the very helpers you’re trying to attract.
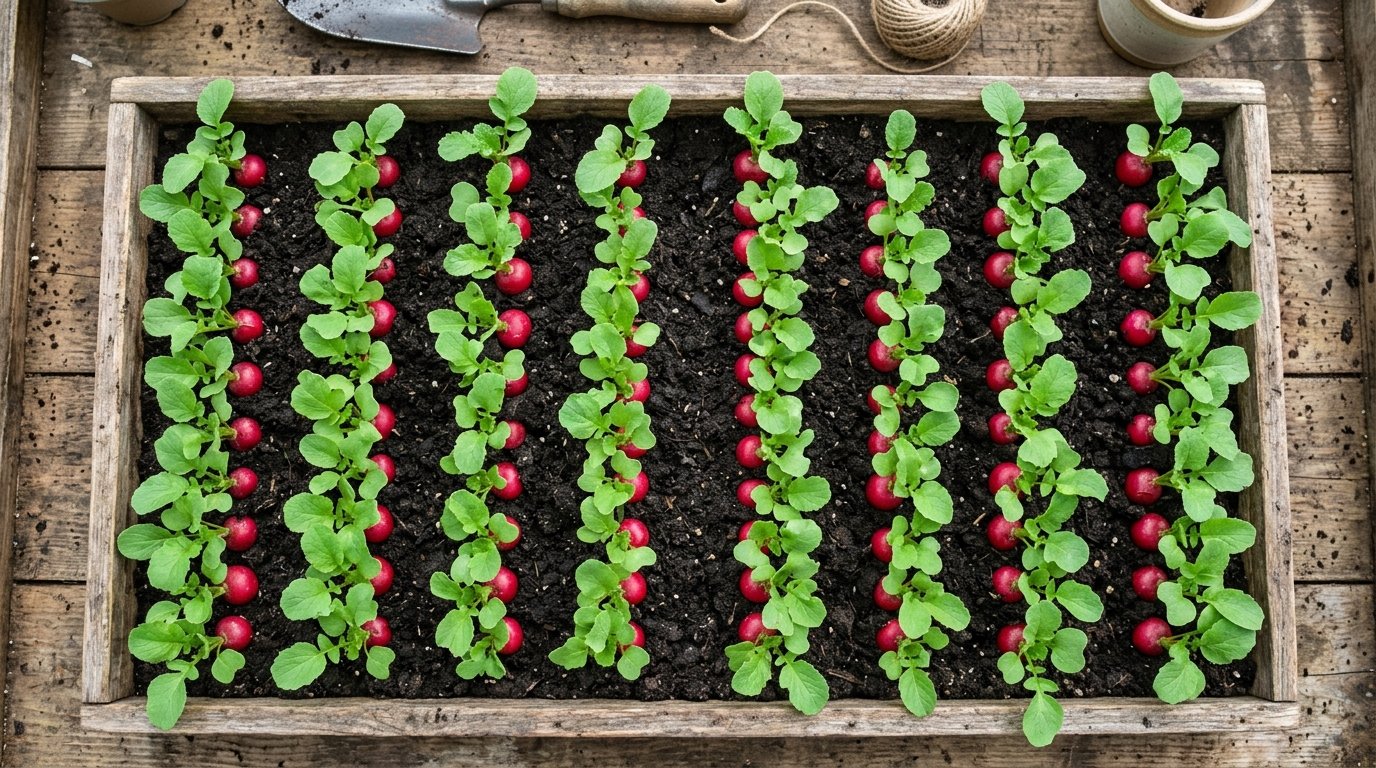
20. Root Vegetable Trays
You can grow radishes, beets, and baby carrots in shallow trays only 6 inches deep. This is a great way to use old dresser drawers or plastic shipping crates that would otherwise be trashed. I’ve seen a single tray produce three dozen radishes in just 25 days. These grow quickly and provide immediate gratification for new gardeners. The cost is essentially just the price of seeds, around $3. Ensure the soil is loose and sandy so the roots can expand without resistance. A common mistake is sowing the seeds too close together; you must thin them out or the roots will stay tiny.
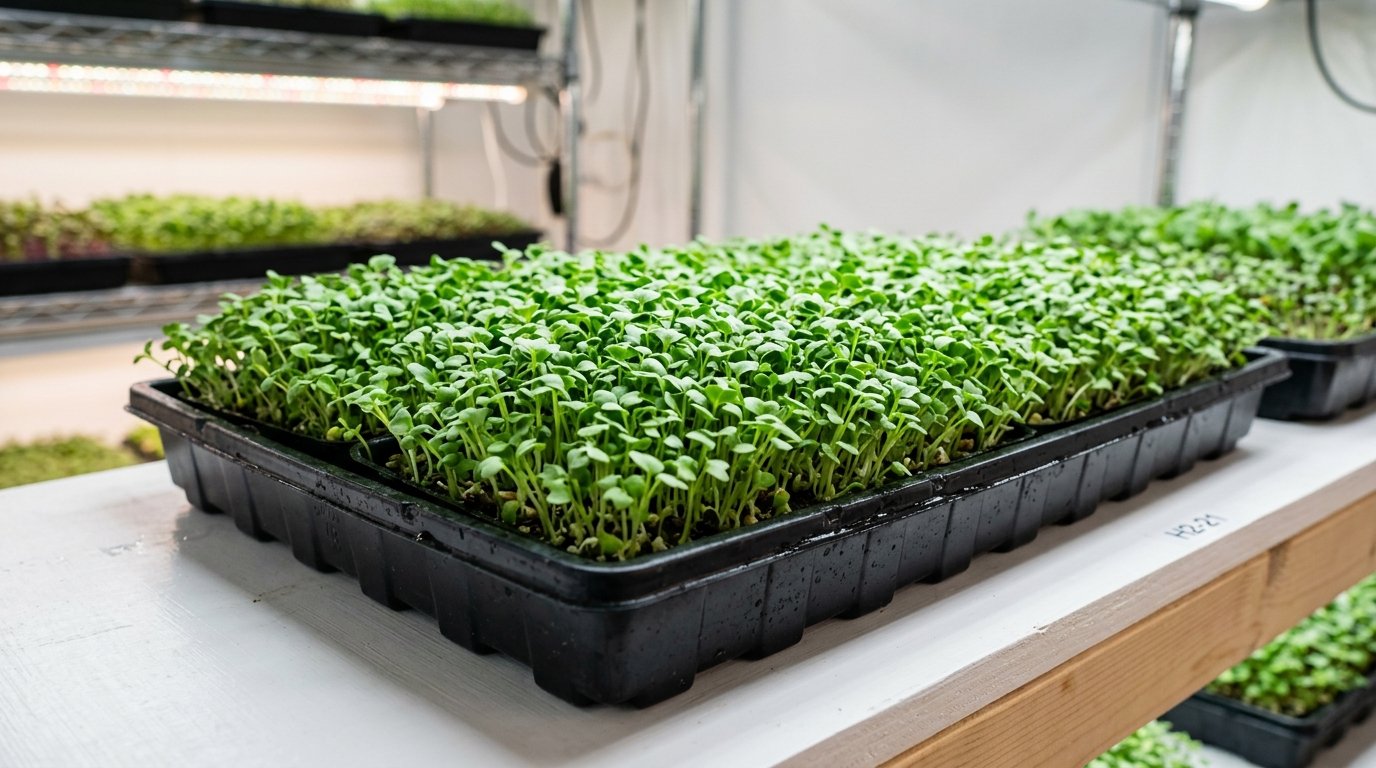
21. Microgreen Seed Trays
Microgreens are the most expensive produce per pound in the supermarket, often costing $30 or more. You can grow them on your kitchen counter in ten days using 10×20 inch plastic trays. I’ve noticed that broccoli and sunflower microgreens are incredibly nutrient-dense and easy to grow. A bag of bulk seed and some coco coir costs about $20 and provides twenty trays of greens. This is a massive ROI compared to buying them at a specialty grocer. You don’t even need high-powered lights; a bright window or a basic shop light works perfectly well for these short-cycle crops.
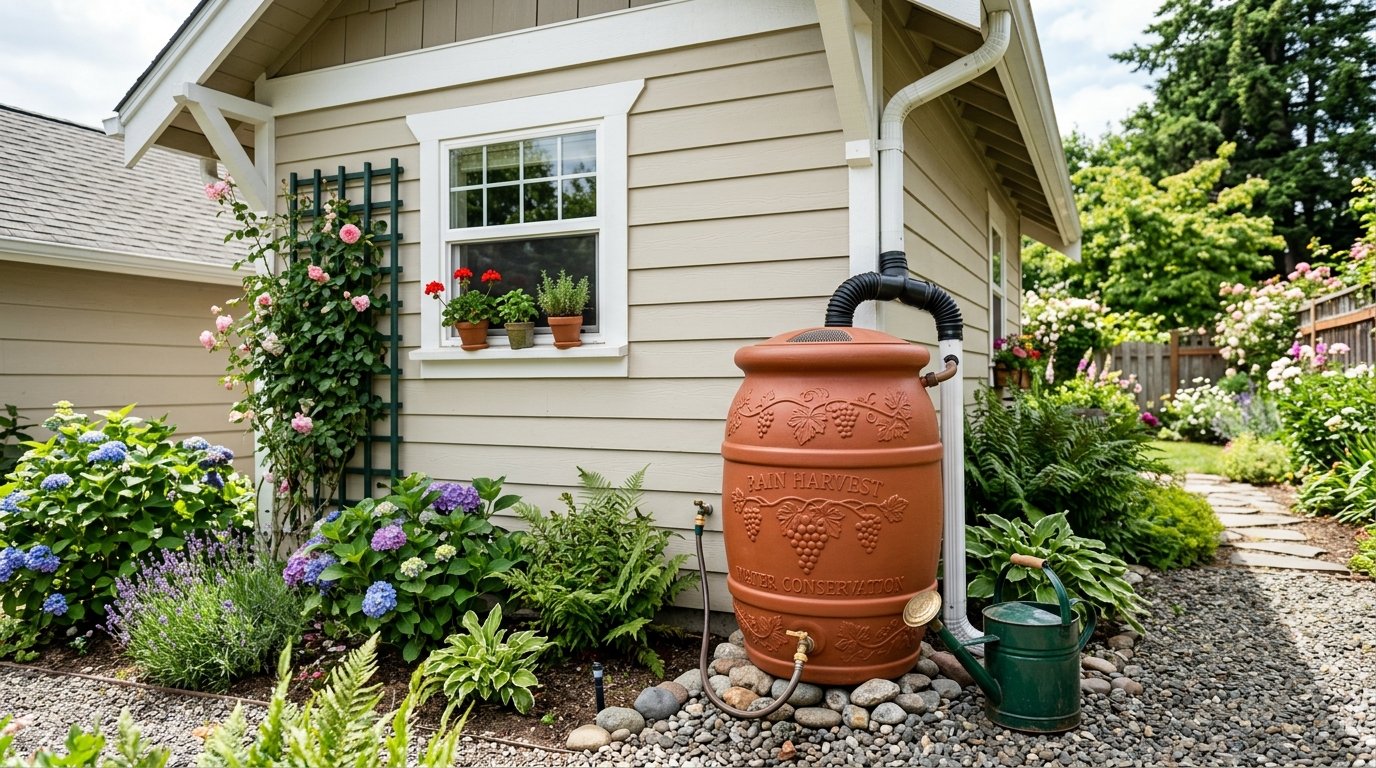
22. Rain Barrel Connection
Collecting water from your roof can save you $50 a season on your utility bill while providing chlorine-free water for your plants. A 50-gallon barrel with a spigot costs about $90, but many cities offer them for $40 through conservation programs. I’ve noticed that plants actually grow better with rainwater because it is slightly acidic and matches their natural needs. Connect the barrel to your downspout and use a watering can to feed your containers. The contrarian note: don’t use rain barrel water for leafy greens if your roof is made of old asphalt shingles, as heavy metals can leach into the soil.
23. Seasonal Harvest Calendar
The final secret to cutting your grocery bill is knowing exactly when to plant so you never have a “dead zone” in your garden. By using a staggered planting schedule, you can harvest from March through November. I’ve seen people double their output just by planting peas in March, tomatoes in May, and kale in August in the same spot. A paper calendar costs nothing but provides the structure needed for a $1,000 annual saving. Most gardeners stop after the first frost, but with the right planning, you can still be eating from your yard while others are paying top dollar for winter imports.
Frequently Asked Questions
How much space do I really need for a kitchen garden?
You can start with as little as a single windowsill or a three-square-foot balcony. Many people believe they need a half-acre to make a difference, but in my experience, a 4×8 foot raised bed is enough to provide salads and herbs for a family of four for the entire summer. The key is choosing high-yield crops like cherry tomatoes and pole beans that grow vertically rather than spreading across the ground. If you have a patio, five to ten large pots can produce a surprising amount of food if you use intensive planting techniques.
What are the best crops to grow to save the most money?
Focus on items that have a high markup at the grocery store or a short shelf life. Culinary herbs like basil, cilantro, and rosemary are the clear winners, as a single plant costs less than one small plastic pack at the store. Leafy greens like arugula and kale are also high-value because they regrow after cutting. I also recommend heirloom tomatoes and organic berries, which are often twice the price of conventional versions. Avoid space-hogs like corn or large pumpkins if you are trying to maximize your financial return in a small area.
Is it cheaper to grow from seeds or buy transplants?
Starting from seeds is significantly cheaper, as a $3 packet can contain 100 plants, whereas a single transplant often costs $5. However, for beginners, buying “starts” for difficult crops like peppers or tomatoes can prevent frustration. I’ve seen many people fail by trying to start everything from seed without the proper light setup indoors. A good compromise is to buy transplants for your main summer crops and use seeds for easy things like beans, peas, radishes, and lettuce, which can be sown directly into the soil.
How much time does maintenance take each week?
Once a garden is established with a mulch layer and an automated irrigation system, you only need about 15 to 30 minutes a week for basic maintenance. This includes minor weeding, checking for pests, and harvesting. Most of the work is front-loaded in the spring during the building and planting phase. I’ve noticed that if you spend five minutes every morning just walking through your garden with a cup of coffee, you can catch problems like aphids or dry soil before they become time-consuming disasters.
Do I need to use chemical fertilizers for a good harvest?
No, and in fact, I’ve seen better long-term results using organic methods. Chemical fertilizers provide a quick burst of growth but can damage the long-term health of your soil and kill beneficial microbes. Using high-quality compost, worm castings, and organic liquid seaweed provides a more balanced nutrient profile. This results in sturdier plants and better-tasting produce. While organic fertilizers like Dr. Earth can be slightly more expensive upfront, they build soil health that reduces the need for other inputs over time.
Can I grow vegetables in the shade?
While most fruiting plants like tomatoes and peppers need 6–8 hours of direct sun, you can still grow a productive garden in partial shade. Leafy greens like spinach, lettuce, and Swiss chard thrive with only 3–4 hours of light. Root vegetables like carrots and beets can also handle less sun, though they will grow more slowly. If your yard is very shady, focus on these “cool season” crops. In my experience, these plants actually taste better when grown in partial shade because they don’t get as bitter or tough in the summer heat.
I’ve seen how small changes like these can completely transform a space and a budget. Starting a kitchen garden is one of the most rewarding ways to connect with your food while keeping your hard-earned money in your pocket. Whether you start with one mason jar of mint or a dozen raised beds, the transformation in flavor and savings is immediate. I encourage you to try just two or three of these ideas this weekend. Save this post on Pinterest to keep these layouts handy, and share it with a friend who wants to start their own edible journey.